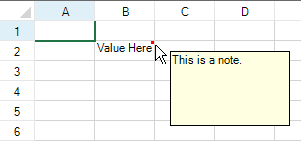
You can add a note to a cell or range of cells. The note may contain text such as a comment, a question, or documentation describing the origin of the cell's value. Each cell with a note attached displays a cell note indicator (by default a small red square) in the upper right corner of the cell. When the pointer is over a cell indicator of a cell that has a note, the note text displays in a box next to the cell. Alternatively, you can set the cell notes to always be displayed, not just when the pointer moves over the indicator. For cell notes that are set as popup notes, they are displayed in a similar manner as text tips. When the pointer is over the cell note indicator, the cell note text appears. This is illustrated in the following figure.
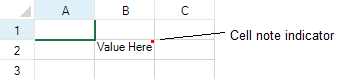
The red square in the upper right corner of the cell indicates that a note is available for that cell. An example is shown in the following figure. You can use the CellNoteIndicatorVisible property to hide the cell note indicator when the pointer is over the cell note indicator. You can use the NoteIndicatorPosition property for the cell to set the location of the note.
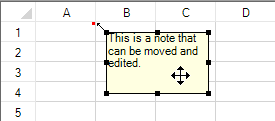
You can allow notes to remain displayed, as if they were sticky notes. In this case they appear in a rectangle next to the cell with an expandable line that attaches the note to the cell, allowing the note to be moved by the user. An example of a sticky note that has been selected is shown in the following figure. The cell NoteStyle property must use the NoteStyle enumeration to allow this. The sticky note in this case is a shape that can be moved.
To move the note, press the left mouse button when the pointer is on the note to select it, drag it to the destination, and release the mouse button to place it. The line from the cell note indicator to the sticky note stretches to accommodate any placement of the note.
You can allow the user to edit cell notes if the notes are always shown. To allow the user to edit it, set the AllowNoteEdit property for the sheet, which sets all sticky notes on that sheet to be editable by the user.
The cell note can contain an extra bit of human readable information for the end user; you can also allow the user to attach their own information in cell notes. The information can be whatever is useful to the end user. For example, the end user might use the cell note to indicate the original source of the cell value (cell note = "Value as obtained from an article in the July issue of our corporate magazine").
You can further customize the use of notes:
There are additional classes that can be used to customize the appearance of the cell note. Use the StickyNoteStyleInfo class for notes.
There are some limitations to the use and display of cell notes:
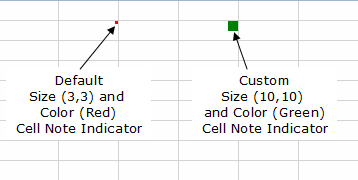
You can change the size and the color of the cell note indicator. The default size of the cell note indicator is a 3x3 square but you can modify the width or the height of the note indicator to any positive integer value. The default color of the cell note indicator is red but you can assign any color value to it. The following figure shows the indicator using default values and a custom indicator using custom values. The custom values are set using the NoteIndicatorColor and NoteIndicatorSize properties.
For more information on notes, refer to the Note property in the Cell class.
For information about printing cell notes, refer to Printing a Sheet with Cell Notes.
This example code sets an editable cell note for a range of cells and sets the color of the cell note indicator to green (from the default red).
| C# |
Copy Code
|
|---|---|
fpSpread1.Sheets[0].AllowNoteEdit = true; fpSpread1.Sheets[0].Cells[1, 1, 3, 3].Note = "test"; fpSpread1.Sheets[0].Cells[1, 1, 3, 3].NoteIndicatorColor = Color.Green; fpSpread1.Sheets[0].Cells[1, 1, 3, 3].NoteStyle = FarPoint.Win.Spread.NoteStyle.StickyNote; |
|
| VB |
Copy Code
|
|---|---|
fpSpread1.Sheets(0).AllowNoteEdit = True fpSpread1.Sheets(0).Cells(1, 1, 3, 3).Note = "test" fpSpread1.Sheets(0).Cells(1, 1, 3, 3).NoteIndicatorColor = Color.Green fpSpread1.Sheets(0).Cells(1, 1, 3, 3).NoteStyle = FarPoint.Win.Spread.NoteStyle.StickyNote |
|
This example code defines a range of cells and then sets the note for that range.
| C# |
Copy Code
|
|---|---|
FarPoint.Win.Spread.Cell range1; range1 = fpSpread1.ActiveSheet.Cells[1, 1, 3, 3]; range1.Value = "Value Here"; range1.Note = "This is the note that describes the value."; |
|
| VB |
Copy Code
|
|---|---|
Dim range1 As FarPoint.Win.Spread.Cell range1 = fpSpread1.ActiveSheet.Cells(1, 1, 3, 3) range1.Value = "Value Here" range1.Note = "This is the note that describes the value." |
|
(Or select the Cells property and click on the button to call up the Cell, Column, and Row editor and select the cells in that editor.)