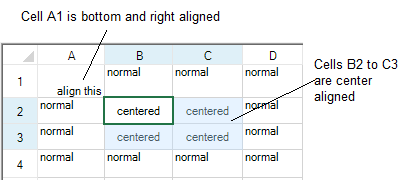
You can determine how the contents are aligned in a cell or in a group of cells. In code, simply set the HorizontalAlignment property and the VerticalAlignment properties, and make use of the CellHorizontalAlignment and CellVerticalAlignment enumerations. In the Spread Designer, set those properties accordingly. The following figure shows the result of the code in the first example.
There are additional properties in the Cell class such as TextIndent and CellPadding that can be used to create extra margins around cell text.
For an explanation of how the alignment affects the overflow of data, refer to Allowing Cell Data to Overflow
You can keep the cell alignment when editing with the AllowEditorVerticalAlign property.
Set the HorizontalAlignment property and the VerticalAlignment properties for the Cells shortcut object.
This example code sets the horizontal alignment of the first cell (A1) to be right-aligned, the vertical alignment of that cell to be bottom-aligned, and the horizontal alignment and vertical alignment of cells from B2 to C3 to be centered. The preceding figure illustrates the results.
| C# |
Copy Code
|
|---|---|
fpSpread1.Sheets[0].Cells[0,0].HorizontalAlignment = FarPoint.Win.Spread.CellHorizontalAlignment.Right; fpSpread1.Sheets[0].Cells[0,0].VerticalAlignment = FarPoint.Win.Spread.CellVerticalAlignment.Bottom; fpSpread1.Sheets[0].Cells[1,1,2,2].HorizontalAlignment = FarPoint.Win.Spread.CellHorizontalAlignment.Center; fpSpread1.Sheets[0].Cells[1,1,2,2].VerticalAlignment = FarPoint.Win.Spread.CellVerticalAlignment.Center; |
|
| Visual Basic |
Copy Code
|
|---|---|
FpSpread1.Sheets(0).Cells(0,0).HorizontalAlignment = FarPoint.Win.Spread.CellHorizontalAlignment.Right FpSpread1.Sheets(0).Cells(0,0).VerticalAlignment = FarPoint.Win.Spread.CellVerticalAlignment.Bottom FpSpread1.Sheets(0).Cells(1,1,2,2).HorizontalAlignment = FarPoint.Win.Spread.CellHorizontalAlignment.Center fpSpread1.Sheets(0).Cells(1,1,2,2).VerticalAlignment = FarPoint.Win.Spread.CellVerticalAlignment.Center |
|
Set the HorizontalAlignment property and the VerticalAlignment properties for the Cell object.
This example code sets the horizontal alignment for a specific cell and the vertical alignment for a range of cells.
| C# |
Copy Code
|
|---|---|
FarPoint.Win.Spread.Cell cellA1; cellA1 = fpSpread1.ActiveSheet.Cells[0, 0]; cellA1.HorizontalAlignment = FarPoint.Win.Spread.CellHorizontalAlignment.Right; cellA1.VerticalAlignment = FarPoint.Win.Spread.CellVerticalAlignment.Bottom; FarPoint.Win.Spread.Cell cellrange; cellrange = fpSpread1.ActiveSheet.Cells[1,1,2,2]; cellrange.HorizontalAlignment = FarPoint.Win.Spread.CellHorizontalAlignment.Center; cellrange.VerticalAlignment = FarPoint.Win.Spread.CellVerticalAlignment.Center; |
|
| Visual Basic |
Copy Code
|
|---|---|
Dim cellA1 As FarPoint.Win.Spread.Cell cellA1 = FpSpread1.ActiveSheet.Cells(0, 0) cellA1.HorizontalAlignment = FarPoint.Win.Spread.CellHorizontalAlignment.Right cellA1.VerticalAlignment = FarPoint.Win.Spread.CellVerticalAlignment.Bottom Dim cellrange As FarPoint.Win.Spread.Cell cellrange = FpSpread1.ActiveSheet.Cells(1, 1, 2, 2) cellrange.HorizontalAlignment = FarPoint.Win.Spread.CellHorizontalAlignment.Center cellrange.VerticalAlignment = FarPoint.Win.Spread.CellVerticalAlignment.Center |
|
You can center-align the contents of the selected cells across columns without merging the cells. This type of horizontal alignment can be set using the HorizontalAlignment.CenterAcrossSelection enumeration option from the GrapeCity.Spreadsheet namespace.
In order to implement the CenterAcrossSelection alignment option, the AllowCellOverflow property of FpSpread class must be set to true and the BorderCollapse property must be set to ‘Enhanced’.
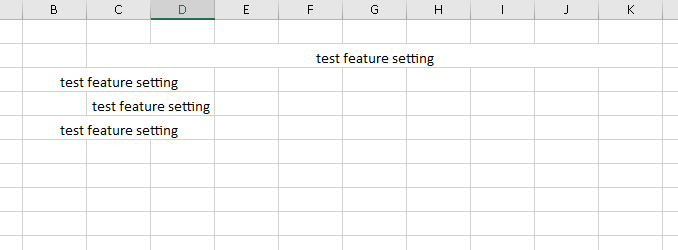
This example code sets the center across selection for cells:
| C# |
Copy Code
|
|---|---|
fpSpread1.AllowCellOverflow = true; fpSpread1.BorderCollapse = BorderCollapse.Enhanced; IWorksheet TestActiveSheet = fpSpread1.AsWorkbook().ActiveSheet; TestActiveSheet.Cells["C2"].Text = "test feature setting"; TestActiveSheet.Cells["C2:K2"].HorizontalAlignment = GrapeCity.Spreadsheet.HorizontalAlignment.CenterAcrossSelection;//set for big range TestActiveSheet.Cells["C3"].Text = "test feature setting"; TestActiveSheet.Cells["C3"].HorizontalAlignment = GrapeCity.Spreadsheet.HorizontalAlignment.CenterAcrossSelection;//set for 1 cell TestActiveSheet.Cells["C4"].Text = "test feature setting"; TestActiveSheet.Cells["C4:D4"].HorizontalAlignment = GrapeCity.Spreadsheet.HorizontalAlignment.CenterAcrossSelection;//set for small range start from data cell TestActiveSheet.Cells["C5"].Text = "test feature setting"; TestActiveSheet.Cells["B5:C5"].HorizontalAlignment = GrapeCity.Spreadsheet.HorizontalAlignment.CenterAcrossSelection;//set for small range end by data cell FarPoint.Win.Spread.Dialogs.BuiltInDialogs.FormatCells(TestActiveSheet.Cells["A1:D5"]).ShowDialog(); |
|
| Visual Basic |
Copy Code
|
|---|---|
FpSpread1.AllowCellOverflow = True FpSpread1.BorderCollapse = BorderCollapse.Enhanced IWorksheet TestActiveSheet = FpSpread1.AsWorkbook().ActiveSheet TestActiveSheet.Cells("C2").Text = "test feature setting" TestActiveSheet.Cells("C2:K2").HorizontalAlignment = GrapeCity.Spreadsheet.HorizontalAlignment.CenterAcrossSelection ' set for big range TestActiveSheet.Cells("C3").Text = "test feature setting" TestActiveSheet.Cells("C3").HorizontalAlignment = GrapeCity.Spreadsheet.HorizontalAlignment.CenterAcrossSelection ' set for 1 cell TestActiveSheet.Cells("C4").Text = "test feature setting" TestActiveSheet.Cells("C4:D4").HorizontalAlignment = GrapeCity.Spreadsheet.HorizontalAlignment.CenterAcrossSelection ' set for small range start from data cell TestActiveSheet.Cells("C5").Text = "test feature setting" TestActiveSheet.Cells("B5:C5").HorizontalAlignment = GrapeCity.Spreadsheet.HorizontalAlignment.CenterAcrossSelection ' set for small range end by data cell FarPoint.Win.Spread.Dialogs.BuiltInDialogs.FormatCells(TestActiveSheet.Cells("A1:D5")).ShowDialog() |
|