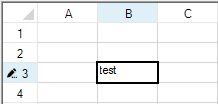
Selections have a default appearance provided by the Spread component and the selection renderer. You can change that appearance, including the background and foreground colors and font. You can also specify a row selector icon with the ShowRowSelector property. You can specify a row edit icon with the ShowEditingRowSelector property as illustrated in the following image.
You can specify whether to display the selection header, border, or active cell with the PaintSelectionHeader, PaintSelectionBorder, or PaintActiveCellInSelection property.
By default, the Spread component uses the appearance set by the selection renderer. When something is selected, the renderer changes the color of the background of the selection. Instead of using this rendering, you can specify specific colors to use for the background and text colors of selections. Alternatively, you can use both the renderer’s appearance and colors you set. Finally, you can specify that no appearance is used to highlight selections.
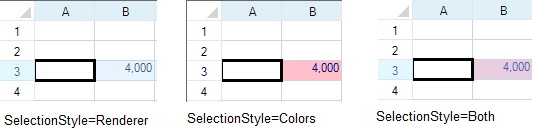
The following figure shows cells selected using the default renderer style, then cells selected using set colors, and finally, cells selected using both the renderer style and set colors.
If no color is set for the selection, then the color is Color.FromArgb(100, 193, 224, 255).
Painting of selected cells is determined by the various properties in the SheetView class:
| SheetView Property | Description |
|---|---|
| SelectionBackColor | Determines the background color of selections |
| SelectionForeColor | Determines the text color of selections |
| SelectionStyle | Determines how the selections are styled using either the colors or a custom renderer or both |
| SelectionFont | Determines the font of the selected text |
When the SelectionStyle is SelectionColors, the cell is painted using the SelectionBackColor and SelectionForeColor settings in place of the cell's ForeColor and BackColor property settings. When the SelectionStyle is SelectionRenderer, the cell is painted using the cell's ForeColor and BackColor property settings. Then a semi-transparent layer is painted over the cell. The semi-transparent layer is accomplished using the following.
| C# |
Copy Code
|
|---|---|
Brush selectionBrush = new SolidBrush(Color.FromArgb(100, 193, 224, 255));
g.FillRectangle(selectionBrush, x, y, width, height);
|
|
For more information, refer to the SelectionStyles enumeration and the ISelectionRenderer interface.
For more information on selection settings, refer to the SelectionRenderer property and the RetainSelectionBlock property in the FpSpread class.
This example code sets the selection highlighting to use the renderer settings and colors.
| C# |
Copy Code
|
|---|---|
// Use the selection renderer and colors. fpSpread1.Sheets[0].SelectionStyle = FarPoint.Win.Spread.SelectionStyles.Both; // Set the background and text colors. fpSpread1.Sheets[0].SelectionBackColor = System.Drawing.Color.Pink; fpSpread1.Sheets[0].SelectionForeColor = System.Drawing.Color.Navy; |
|
| VB |
Copy Code
|
|---|---|
' Use the selection renderer and colors. fpSpread1.Sheets(0).SelectionStyle = FarPoint.Win.Spread.SelectionStyles.Both ' Set the background and text colors. fpSpread1.Sheets(0).SelectionBackColor = System.Drawing.Color.Pink fpSpread1.Sheets(0).SelectionForeColor = System.Drawing.Color.Navy |
|
This example code sets the selection highlighting to use the renderer settings and colors.
| C# |
Copy Code
|
|---|---|
FarPoint.Win.Spread.SheetView newsheet=new FarPoint.Win.Spread.SheetView(); // Use the selection renderer and colors. newsheet.SelectionStyle = FarPoint.Win.Spread.SelectionStyles.Both; newsheet.SelectionBackColor = System.Drawing.Color.AliceBlue; // Set the background and text colors. newsheet.SelectionForeColor = System.Drawing.Color.Navy; // Assign the SheetView to a sheet in the component. fpSpread1.Sheets[0] = newsheet; |
|
| VB |
Copy Code
|
|---|---|
Dim newsheet As New FarPoint.Win.Spread.SheetView() ' Use the selection renderer and colors. newsheet.SelectionStyle = FarPoint.Win.Spread.SelectionStyles.Both ' Set the background and text colors. newsheet.SelectionBackColor = System.Drawing.Color.AliceBlue newsheet.SelectionForeColor = System.Drawing.Color.Navy ' Assign the SheetView to a sheet in the component. fpSpread1.Sheets(0) = newsheet |
|