The horizontal axis has a general and a date type. The general type specifies that all the points are painted along the axis at the same distance. The date type specifies which points are drawn and can have different distances between the points based on the day unit.
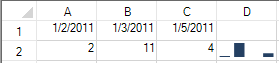
Set the DateAxis property to true in the ExcelSparklineSetting class to use the date horizontal axis and the DisplayXAxis property if you wish to display the axis line. If a cell is blank in the date range, then that point is not drawn by default with the date axis. The following image displays all three points on the graph but leaves a larger gap between the second and third points to show the distance between January 3rd and January 5th.
You can specify different minimum and maximum value options for the vertical axis. The automatic option allows each sparkline to have a different minimum and maximum value. The same option uses the same minimum and maximum value for all the sparklines. The custom option allows you to specify the minimum and maximum value for all the sparklines in a group.
If the custom option is used for the vertical axis, and the minimum value is equal to or larger than all data points, points or lines are not drawn. Lines or columns are truncated if they are not completely in the drawing area. If a column sparkline has at least one point drawn completely or partially, then all columns with values less than the minimum are drawn as thin columns that extend down.
See the ManualMax, ManualMin, MaxAxisType, and MinAxisType properties in the ExcelSparklineSetting class for vertical axis examples.
This example creates a column sparkline in a cell with a date horizontal axis.
| C# |
Copy Code
|
|---|---|
FarPoint.Win.Spread.ExcelSparklineSetting ex = new FarPoint.Win.Spread.ExcelSparklineSetting(); ex.DisplayXAxis = true; ex.DateAxis = true; ex.Formula = "Sheet1!$A$1:$C$1"; fpSpread1.Sheets[0].Cells[0, 0].Text = "1/2/2011"; fpSpread1.Sheets[0].Cells[0, 1].Text = "1/3/2011"; fpSpread1.Sheets[0].Cells[0, 2].Text = "1/5/2011"; fpSpread1.Sheets[0].Cells[1, 0].Value = 2; fpSpread1.Sheets[0].Cells[1, 1].Value = 11; fpSpread1.Sheets[0].Cells[1, 2].Value = 4; fpSpread1.Sheets[0].AddSparkline("Sheet1!$A$2:$C$2", "Sheet1!$D$2:$D$2", FarPoint.Win.Spread.SparklineType.Column, ex); |
|
| VB |
Copy Code
|
|---|---|
Dim ex As New FarPoint.Win.Spread.ExcelSparklineSetting() ex.DisplayXAxis = True ex.DateAxis = True ex.Formula = "Sheet1!$A$1:$C$1" fpSpread1.Sheets(0).Cells(0, 0).Text = "1/2/2011" fpSpread1.Sheets(0).Cells(0, 1).Text = "1/3/2011" fpSpread1.Sheets(0).Cells(0, 2).Text = "1/5/2011" fpSpread1.Sheets(0).Cells(1, 0).Value = 2 fpSpread1.Sheets(0).Cells(1, 1).Value = 11 fpSpread1.Sheets(0).Cells(1, 2).Value = 4 fpSpread1.Sheets(0).AddSparkline("Sheet1!$A$2:$C$2", "Sheet1!$D$2:$D$2", FarPoint.Win.Spread.SparklineType.Column, ex) |
|