What's New in Spread.NET v14
.NET 5.0 and .NET Core 3.1 Windows Forms Controls

Figure 1 New GrapeCity.Spread.WinForms NuGet Package
Spread. NET v14 includes a new NuGet package GrapeCity.Spread.WinForms for .NET 5 and .NET Core 3.1 WinForms. Using this new package, which will be distributed on nuget.org, users can create WinForms applications using the Spread controls in .NET 5 and .NET Core 3.1 and port existing WinForms projects using GrapeCity Spread. NET controls.
Design-time support is limited in the new platforms, so it is recommended to keep using the full-framework (.NET 4.5.2 and later) controls in regular .NET WinForms projects. Use those projects for editing and design-time, and create separate projects which link the source and resource files to build .NET 5 and .NET Core 3.1 versions.
The new GrapeCity.Spread.WinForms NuGet package supports multi-targeting. Use net5.0-windows;netcoreapp3.1 to create multi-targeted builds. Use the NuGet Package Manager in Visual Studio 2019 to install the GrapeCity.Spread.WinForms package in older .NET 4.5.2+ projects to upgrade the controls.
Important Note About Design-Time Support: Please note that the design-time support for custom controls in .NET 5 and .NET Core 3.1 is limited. The Spread Designer tool and other design-time support like type converters and type editors for the property grid are not supported in this release's new platforms. For design-time support using the Spread Designer tool and other design-time editors, you must use the full-framework controls in a project which targets .NET 4.5.2 or later. You can create parallel projects to build your code for .NET 5 and .NET Core 3.1 and share the same source between those projects using source links. You must also save the design-time changes applied using earlier releases of Spread. NET WinForms (v13 and earlier) using v14 to update some classes to serialize the control. Some previously serializable classes in earlier versions of the .NET Framework are no longer serializable in .NET 5. Please see my other blog post- New Support for .NET 5 and .NET Core, for full details about creating such projects.
Cell Data Types for .NET Objects

Figure 2 Cell Data Types examples
Cell Data Types are a significant new enhancement in Spread. NET v14 WinForms. This feature lets you create a custom data type by defining a class and implementing the properties for the data type, then create objects using that class and set those to cells. The object will show in the cell using a custom image and display the object's default property value. When the cell is active, the Insert Data tool will show next to the cell (see cell B12 above). When the Insert Data tool is clicked, a pop-up list appears and lists the available fields for the data type to insert in adjacent cells or columns:

Figure 3 Cell Data Types Insert Data tool showing field list
In the above example, three Customer objects are in cells B7:B9. The list of available fields shows the Name, Email, and Vehicle fields. These fields are already displayed in adjacent cells in this example, but you can add new fields in empty adjacent cells or columns by selecting the field from the pop-up list. The fields are available in calculations using formulas like "=B7.Email," and clicking the field in the pop-up list will automatically insert the appropriate formula. Click the glyph in the cell or press Ctrl+Shift+F5 with the cell active to show the Data Card for the object:

Figure 4 Cell Data Types popup Data Card for cell object
To create these data types:
- Define the class for the cell data type and specify the properties that you want to show for the object.
- Create an instance of the class initialized with the appropriate properties, and use RichValue < T > to create the IRichValue objects using your class instances.
- For more control and faster implementation that does not require reflection, implement IRichValue on the cell data type class directly, and specify the fields through the interface.
The Vehicle class in the above example is implemented this way.
To help speed the creation of custom cell data types, we have implemented built-in support for wrapping a DataTable or a DataView inside a cell data type. This example shows how to return a custom cell data type using an External Variable with BuiltInRichValue.FromDataTable.

Figure 5 Using External Variables to return IRichValue for DataTable
Cell Data Types can return array values that spill to adjacent cells when dynamic arrays are enabled. Cell data types can contain other cell data types, as shown in the example with Customer and Vehicle above. You can also perform calculations that reference the field values in the cell data types. In case the field name has space characters embedded as above, use brackets around the field name: "=$B6.[Week 2]" (just like for sheet names).
Hyperlink Enhancements

Figure 6 Hyperlinks Basic Usage demo
Spread. NET v14 includes many enhancements for Hyperlink support:
- Links to cell references
- Links to named ranges
- Links to tables
- Links to email
- Links to web sites and files
- Links from cells, shapes, and images
- Custom tooltip text for links
- Automatic creation of links when editing cells
Easily create a table of contents or index for a workbook with links to essential sections organized in cells or shapes, and specify the screen tip text to show the user. Enable the AutoCreateHyperlink feature and create hyperlinks while editing cells. Create internal workbook links using a special syntax like "spread://Sheet1!A1" to specify the location. This syntax also supports named ranges like "spread://SalesSummary" and table names like "spread://Table1". Automatically create hyperlinks to cell locations by typing the link target into cells.
Use Ctrl+K to invoke the new built-in Edit Hyperlink dialog to modify the link target, text to display, and screen tip text:

Figure 7 Edit Hyperlink dialog
Use the HYPERLINK function to create a hyperlink in the cell and specify the text to display. These links can now target cell locations, named ranges, and table names, as well as email addresses, web site, and file links.
LET Function and Formula Performance Optimizations
The new LET function is surprisingly robust:
- LET makes formulas easier to read and understand
- LET helps formulas calculate faster and more efficiently
The LET Function allows you define local names inside a formula, then use those names to calculate some expression.
Each time a local name is used in the expression, its associated value calculates the expression result. This action can significantly reduce the total number of calculations required when the same name is referenced many times in the expression. Before the LET Function, these expressions had to calculate those results multiple times. The formulas can be changed to use worksheets or workbook names to optimize the calculation, stored separately from the cell formulas using them in the Name Manager.
Using the Name Manager to create lists of names defined in the worksheets and workbook for calculations used in formulas can quickly get unwieldy and lead to confusion over scoping issues in formulas. (Which name is that formula using to calculate the value, the worksheet name, or the workbook name?) Scoping problems are solved with new scoping rules using the new LET Function. These rules permit the local formula to define the names that it used explicitly inside the same formula. Those names will override the worksheet and workbook names when calculating the expression.

Figure 8 LET function calculates three times faster
The new LET Function also optimizes calculations by eliminating redundant recalculation of intermediate values that can instead be calculated just once and reused in the calculation. Workbooks calculate much faster. In the above example, the spreadsheet on the left side uses the LET Function to optimize a calculation. It calculates the result three times faster than the spreadsheet on the right side, not using the LET Function and performing the same calculation. For more detailed information about the new LET function and how it can help clarify and optimize your formulas, please this blog: New Excel LET Function Enhances Calculation Performance.
The Show Formulas Command
The new Show Formulas command works similar to Microsoft Excel: press Ctrl+` to toggle the Show Formulas mode in Spread. NET 14 WinForms.
To enable this built-in command, set FpSpread.Features.ExcelCompatibleKeyboardShortcuts= true in design-time or in code. Here is an example worksheet in the new Spread Designer to illustrate the Show Formulas command:

Figure 9 ShowFormulas example worksheet
The ShowFormulas command is available in the Spread Designer ribbon bar in the Formulas tab:

Figure 10 New ShowFormulas ribbon bar button
The ShowFormulas command applies to the active worksheet. It widens all columns to twice their current width and shows all cell formulas in the cells instead of calculated values:

Figure 11 ShowFormulas mode in the example worksheet
Press Ctrl+` or use the ribbon bar button in the Spread Designer to toggle the mode off again.
Edit Points to Create Custom Shapes
Spread. NET v13 introduced the new Enhanced Shape Engine with support for importing and creating all Microsoft Excel shapes. Please see this blog for details about that feature: Create Advanced Shapes with the Spread.NET 13 WinForms Enhanced Shape Engine. To use the new Edit Points feature to create custom shapes, enable the Enhanced Shape Engine.
The new Edit Points command enables users to customize the points and segments of the shape. The Edit Points command is available in the shape context menu by right-clicking any enhanced shape:

Figure 12 Edit Points command in enhanced shape context menu
The Edit Points command is also available in the Spread Designer ribbon bar in the Shape Format tab in the Edit Shape menu when any enhanced shape is selected:

Figure 13 Edit Points command in the Spread Designer ribbon bar
After invoking the Edit Points command, the Shape Points are displayed in their current locations in the shape, and the cursor changes to SizeAll when the mouse is over a shape point:

Figure 14 Using Edit Points on shape
While using Edit Points on the enhanced shape, you can click and drag a Shape Point to a new location or select a Shape Point to edit by clicking the point and then use the arrow keys to move the point. After choosing a Shape Point, the associated Control Points for the adjacent segments are displayed as white boxes:

Figure 15 Select point to show spline curve points
The Control Points can modify the curve between the selected Shape Point and adjacent Shape Points. The Shape Point in the upper-right corner chosen in the image above is a Corner Point, so the Control Points form a right angle with the Shape Point. These Control Points can be moved independently to modify the curve in the adjacent segments. Drag and drop them using the mouse, or click to select a point and use the arrow keys.
Right-click the point to see the Shape Point context menu, which can be used to Add and Delete shape points, to Open and Close the path, and to toggle the selected point between Smooth Point, Straight Point, and Corner Point:

Figure 16 Shape Point context menu
Changing a Shape Point type resets the spline curve points. Adding new points enables the creation of more complex shapes. Add a new Shape Point using Ctrl+Click in the shape segment to add the new Shape Point. Delete Shape Points using Ctrl+Click on the Shape Point.
Change the Shape Point type while moving one of the Control Points:
- Press the Shift key to change the Shape Point to a Smooth Point.
- Press the Ctrl key to change the Shape Point to a Straight Point.
- Press the Alt key to change the Shape Point to a Corner Point.
The Teardrop shape in this example has five points:
- Two Smooth Points at the left and bottom
- Two Straight Points at the top and right
- One Corner Point in the upper-right corner
Enhanced Keyboard Shortcuts
Spread. NET v14 WinForms introduces a new simple property for enabling Microsoft Excel compatible keyboard shortcuts in the spreadsheet for the end-user.
Set FpSpread.Features.ExcelCompatibleKeyboardShortcuts= true in design-time or initialization code, and the following key mappings are loaded to associate these built-in SpreadAction objects with the default keyboard shortcuts:
| Key Code | SpreadAction | Description |
| Ctrl + ' | DisplayFormulas | Toggle Show Formulas mode |
| Ctrl + 1 | ShowFormatCellsDialog | Show Format Cells dialog |
| Ctrl + Shift + F5 | ShowCard | Show Card (for .NET object) |
| Ctrl + K | ShowHyperlinkDialog | Show Edit Hyperlink dialog |
| Ctrl + Enter | EditMultipleCells | Input data for multiple cells |
Setting FpSpread.Features.ExcelCompatibleKeyboardShortcuts = false removes those key mappings and restores the default behavior. Create custom key mappings using the InputMap API to create custom shortcuts with the new built-in SpreadAction objects for DisplayFormulas, ShowFormat CellsDialog, ShowCard, ShowHyperlinkDialog, and EditMultipleCells.
Multiple Sheet Select
Spread. NET v14 WinForms includes new built-in support for Selecting Multiple Worksheets using Ctrl + Click on the worksheet tab, as in Microsoft Excel. When selecting multiple worksheets, each of those chosen worksheets shows as active behind the actual active worksheet:

Figure 17 Multiple Worksheet Selected
When multiple worksheets are selected, the user can drag and drop the selected worksheets to rearrange them in the workbook. In the following example, Sheet1 and Sheet3 are moved to the end of the workbook, after Sheet4:
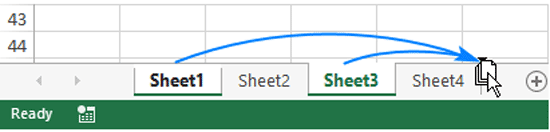
Figure 18 Moving selected worksheets using drag and drop
When the Ctrl key is pressed while dragging the selected worksheets, those worksheets are copied instead of moved:

Figure 19 Copy selected worksheets using Ctrl with drag and drop
Updates for Spread.NET v14
Spread.NET v14 - November 11, 2020
- .NET 5.0 and .NET Core 3.1 Windows Forms Controls
- Cell Data Types for .NET Objects
- Hyperlink Enhancements
- LET Function and Formula Performance Optimizations
- Show Formulas
- Edit Points to Create Custom Shapes
- Enhanced Keyboard Shortcuts
- Multiple Sheet Select