In ActiveReports, the simplest reporting style is a tabular listing of fields from a data source.
This walkthrough illustrates the basics of setting up bound reports by introducing the ideas of using the DataSource icon and dragging fields from the Report Explorer onto the report.
The walkthrough is split up into the following activities:
- Adding an ActiveReport to the Visual Studio project
- Connecting to a data source
- Adding controls to the report
- Viewing the report
When you complete this walkthrough you get a layout that looks similar to the following at design time and at run time.
Design-Time Layout
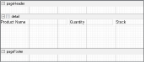
Data bound report at design time
Run-Time Layout
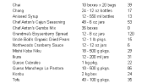
Data bound report at run time
To add an ActiveReport to the Visual Studio project
- Create a new Visual Studio project.
- From the Project menu, select Add New Item.
- In the Add New Item dialog that appears, select ActiveReports 14 Section Report (code-based) and in the Name field, rename the file as rptBound.
- Click the Add button to open a new section report in the designer.
See Quick Start for information on adding different report layouts.
To connect the report to a data source
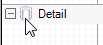
- On the detail section band, click the Data Source Icon.
- In the Report Data Source dialog that appears, on the OLE DB tab, next to Connection String, click the Build button.
- In the Data Link Properties window that appears, select Microsoft Jet 4.0 OLE DB Provider and click the Next button to move to the Connection tab.
- Click the ellipsis (...) button to browse to your database, for example the NWind.mdb sample database. Click Open once you have selected the appropriate database path.
- Click the Test Connection button to see if you have successfully connected to the database.
- Click OK to close the Data Link Properties window and return to the Report Data Source dialog. Notice that the Connection String field gets filled automatically.
- In the Query field on the OLE DB tab, enter the following SQL query.
SQL Query Copy CodeSELECT * FROM Products - Click OK to save the data source and return to the report design surface.
To create a layout for the report
- In the Visual Studio toolbox, expand the ActiveReports 14 Section Report node and drag three TextBox controls onto the detail section and set the properties of each textbox as indicated:
TextBox1
Property Name Property Value DataField ProductName Text Product Name Location 0, 0in Size 2.3, 0.2in TextBox2
Property Name Property Value DataField QuantityPerUnit Text Quantity Location 2.4, 0in Size 1.5, 0.2in TextBox3
Property Name Property Value DataField UnitsInStock Text Stock Location 4, 0in Size 1, 0.2in - Click just below the fields to select the Detail section, and in the Properties Window, set the CanShrink property to True to eliminate white space in the rendered report.
To view the report
- Click the preview tab to view the report at design time.
OR
- Open the report in the Viewer. See Windows Forms Viewer for further information.