Using XML data requires some setup that is different from other types of data. This walkthrough illustrates how to set up a subreport bound to the XML DataSource in the parent report.
This walkthrough is split up into the following activities:
- Adding an ActiveReport to the Visual Studio project
- Connecting the parent report to an XML data source
- Adding controls to display the data
- Adding code to create a new instance of the subreport
- Adding code to pass a subset of the parent report's data to the subreport
- Viewing the report
When you complete this walkthrough you get a layout that looks similar to the following at design time and at run time.
Design-Time Layout
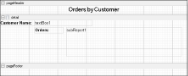
Subreport with XML data at design time
Run-Time Layout
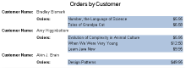
Subreport with XML data at run time
To add an ActiveReport to the Visual Studio project
- Create a new Visual Studio project.
- From the Project menu, select Add New Item.
- In the Add New Item dialog that appears, select ActiveReports 14 Section Report (code-based) and in the Name field, rename the file as rptMain.
- Click the Add button to open a new section report in the designer.
- From the Project menu, select Add New Item.
- In the Add New Item dialog that appears, select ActiveReports 14 Section Report (code-based) and in the Name field, rename the file as rptSub.
- Click the Add button to open a second new section report in the designer.
See Quick Start for information on adding different report layouts.
To connect the Parent Report (rptMain) to a data source
- On the detail section band, click the Data Source Icon.
- In the Report Data Source dialog, on the XML tab, click the ellipsis (...) button next to File URL field.
- In the Open File window that appears, navigate to Customer.xml and click the Open button.
- In the Recordset Pattern field, enter
//CUSTOMER. - Click OK to save the data source and return to the report design surface.
To create a layout for the Parent Report (rptMain)
- On the design surface, select the pageHeader section and in the Properties window, set the Height property to 0.3.
- On the design surface, select the grey area outside the report and in the Properties window, set the PrintWidth property to 6.5.
- On the design surface, select the detail section and in the Properties window, set the CanShrink property to True to eliminate white space.
- From the toolbox, drag the Label control onto the pageHeader section and in the Properties window, set the properties as follows.
Property Name Property Value Text Orders by Customer Location 0, 0 in Size 6.5, 0.25 in Font Arial, 14pt, style=Bold Alignment Center - From the toolbox, drag the controls onto the detail section and in the Properties window, set the properties of each control as follows.
TextBox1
Property Name Property Value DataField NAME Location 1.2, 0 in Size 2, 0.2 in Label1
Property Name Property Value Text Customer Name: Location 0, 0 in Size 1.2, 0.2 in Font Bold True Label2
Property Name Property Value Text Orders: Location 1.2, 0.25 in Size 1, 0.2 in Font Bold True Subreport
Property Name Property Value Location 2.3, 0.25 in Size 4, 1 in
To create a layout for the Child Report (rptSub)
- On the design surface, select the detail section and in the Properties window, set the properties as follows.
Property Name Property Value CanShrink True BackColor LightSteelBlue Tip: Even if you do not want colors in your finished reports, using background colors on subreports can help in troubleshooting layout issues. - On the design surface, right-click the pageHeader or pageFooter section and select Delete. Subreports do not render these sections, so deleting them saves processing time.
- From the toolbox, drag the following controls to the detail section and in the Properties window, set the properties as follows.
TextBox1
Property Name Property Value DataField TITLE Name txtTitle Location 0, 0 in Size 2.9, 0.2 in TextBox2
Property Name Property Value DataField PRICE Name txtPrice Location 3, 0 in Size 1, 0.2 in Alignment Right OutputFormat $#,##0.00 (or select Currency in the dialog)
To add code to create a new instance of the Child Report (rptSub)
To write the code in Visual Basic
- Right-click the design surface of rptMain and select View Code.
- At the top left of the code view of the report, click the drop-down arrow and select (rptMain Events).
- At the top right of the code window, click the drop-down arrow and select ReportStart. This creates an event-handling method for the ReportStart event.
- Add code to the handler to create an instance of rptSub.
The following example shows what the code for the method looks like.
| Visual Basic.NET code. Paste JUST ABOVE the ReportStart event. |
Copy Code
|
|---|---|
| Dim rpt As rptSub | |
| Visual Basic.NET code. Paste INSIDE the ReportStart event. |
Copy Code
|
|---|---|
| rpt = New rptSub | |
To write the code in C#
- Click in the gray area below rptMain to select it.
- Click the events icon in the Properties Window to display available events for the report.
- Double-click ReportStart. This creates an event-handling method for the report's ReportStart event.
- Add code to the handler to create a new instance of rptSub.
The following example shows what the code for the method looks like.
| C# code. Paste JUST ABOVE the ReportStart event. |
Copy Code
|
|---|---|
| private rptSub rpt; | |
| C# code. Paste INSIDE the ReportStart event. |
Copy Code
|
|---|---|
| rpt = new rptSub(); | |
To add code to pass a subset of the Parent Report's data to the Child Report
To add code to pass a subset of the parent report's data to the subreport
- Double-click in the detail section of the design surface of rptMain to create a detail_Format event.
- Add code to the handler to:
- Create a new GrapeCity XMLDataSource
- Type cast the new data source as rptMain's data source and set the NodeList to the "ORDER/ITEM" field
- Display rptSub in the subreport control
- Pass the new data source to the subreport
To write the code in Visual Basic
The following example shows what the code for the method looks like.
| Visual Basic.NET code. Paste INSIDE the Format event. |
Copy Code
|
|---|---|
    Dim xmlDS As New GrapeCity.ActiveReports.Data.XMLDataSource
    xmlDS.NodeList = CType(CType(Me.DataSource, GrapeCity.ActiveReports.Data.XMLDataSource).Field("ORDER/ITEM", True), System.Xml.XmlNodeList)
    rpt.DataSource = xmlDS
    SubReport1.Report = rpt
|
|
To write the code in C#
The following example shows what the code for the method looks like.
| C# code. Paste INSIDE the Format event. |
Copy Code
|
|---|---|
   GrapeCity.ActiveReports.Data.XMLDataSource xmlDS = new GrapeCity.ActiveReports.Data.XMLDataSource();
   xmlDS.NodeList = (System.Xml.XmlNodeList)((GrapeCity.ActiveReports.Data.XMLDataSource) this.DataSource).Field("ORDER/ITEM", true);
   rpt.DataSource = xmlDS;
   subReport1.Report = rpt;
|
|
To view the report
- Click the preview tab to view the report at design time.
OR
- Open the report in the Viewer. See Windows Forms Viewer for further information.