Parameterized Reports
In This Topic
You can create a parameterized report with ActiveReports and provide the ability to select multiple values for those who want to view data for several items.
This walkthrough illustrates how to create a report with multi-value parameters and an option to select all of the data.
The walkthrough is split up into the following activities:
- Adding an ActiveReport to a Visual Studio project
- Connecting the report to a data source
- Adding a Dataset with a parameter
- Creating a Dataset to populate the parameter values
- Adding a Report Parameter
- Adding controls to the report to contain data
- Viewing the report
Note:
- This walkthrough uses the Products table from the Nwind database. The NWIND.mdb file can be downloaded from GitHub: ..\Samples14\Data\NWIND.mdb.
- Although this walkthrough uses RDL report, you can also implement this using Page report.
When you complete this walkthrough you get a layout that looks similar to the following at design time and at run time.
Design-Time Layout

Run-Time Layout
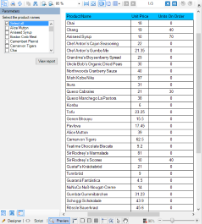
Parameterized report at run time
To add an ActiveReport to the Visual Studio project
- Create a new Visual Studio project.
- From the Project menu, select Add New Item.
- In the Add New Item dialog that appears, select ActiveReports 14 RDL Report and in the Name field, rename the file as Product Details.
- Click the Add to open a new rdl report in the designer.
See Quick Start for information on adding different report layouts.
To connect the report to a data source
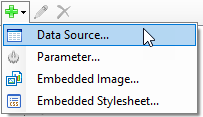
- In the Report Explorer, right-click the Data Sources node and select the Add Data Source option or select Data Source from the Add button.
- In the Report Data Source Dialog that appears, select the General page and in the Name field, enter a name like ReportData.
- On this page, create a connection to the Nwind database. See Connect to a Data Source for information on connecting to a data source.
To add a dataset to populate the parameter values
- In the Report Explorer, right-click the data source node and select the Add Data Set option.
- In the DataSet Dialog that appears, select the General page and enter the name of the dataset as DataSet1. This name appears as a child node to the data source icon in the Report Explorer.
- On the Query page of this dialog, in the Query field enter the following SQL query.
SQL Query Copy Codeselect distinct productName from Products
- Click the Validate DataSet icon at the top right hand corner above the Query box to validate the query.
- Click OK to close the dialog. You see the data set, DataSet1, and the field, productName in the Report Explorer.
To add a parameter to the report
- In the Report Explorer, select the Parameters node.
- Right-click the node and select Add Parameter to open the Report - Parameters dialog.
- In the dialog box that appears, click the Add(+) button to add a new parameter in the list.
- Set properties in the following fields below the parameters list.
In the General tab:
- Name: ReportParameter1
- DataType: String
- Text for prompting users for a value: Select the product name.
- Select the check box next to Multivalue to allow users to select more than one product name from the list.
- Enter Value for 'Select All': 1
In the Available Values tab, select From query:
- DataSet: DataSet1
- Value: productName
- Label: productName
Note: The name of the parameter you enter must exactly match the name of the parameter in the linked report, and it is case sensitive. You can pass a value from the current report to the parameter in the Value column of the list. If a value is not supplied for an expected parameter in the linked report, or if the parameter names do not match, the linked report will not run.
- Click OK to close the dialog and add the parameter to the collection. The ReportParameter1 parameter appears under the Parameters node in the Report Explorer.
To add a dataset with a parameter
- In the Report Explorer, right-click the data source node and select the Add Data Set option.
- In the DataSet Dialog that appears, select the General page and enter the name of the dataset as DataSet2. This name appears as a child node to the data source icon in the Report Explorer.
- On the Parameters page under Parameter Name enter ReportParameter1.
- Under Value enter
=Parameters!ReportParameter1.Value. - On the Parameters page under Parameter Name enter Parameter1.
- Under Value enter
=Parameters!ReportParameter1.Value. - On the Query page of this dialog, in the Query field enter the following SQL query.
SQL Query Copy Codeselect * from products where ProductName in (?) OR '1' in (?)
- Click the Validate DataSet icon at the top right hand corner above the Query box to validate the query.
- Click OK to close the dialog. Your data set and queried fields appear as nodes in the Report Explorer.
To create a layout for the report
- From the toolbox, drag a Table control onto the design surface and in the Properties window, set the following properties.
Property Name Property Value Location 0.5in, 0.25in DataSetName DataSet2 Size 4.8in, 0.75in - In the Report Explorer, from the DataSet2 dataset drag the following fields into the detail row of the table and set their properties as in the following table.
Field Column Width ProductName TableColumn1 2.37in UnitPrice TableColumn2 0.67in UnitsOnOrder TableColumn3 1.62in - Static labels with the field names are automatically created in the table header row. To improve the appearance of the report, select the table header row, and set the BackgroundColor to DeepSkyBlue.
To view the report
- Click the preview tab to view the report at design time.
OR
- Open the report in the Viewer. See Windows Forms Viewer for further information.
See Also