Reports with Custom Code
In This Topic
This walkthrough illustrates how to create a simple report with custom code.
The walkthrough is split up into the following activities:
- Adding an ActiveReport to a Visual Studio project
- Connecting the report to a data source
- Adding a dataset
- Adding controls to the report to contain data
- Embedding code in a report and referencing it in a field expression
- Viewing the report
Note:
- This walkthrough uses the Store table from the Reels database. The Reels.mdb file can be downloaded from GitHub: ..\Samples14\Data\Reels.mdb.
- Although this walkthrough uses Page reports, you can also implement this using RDL reports.
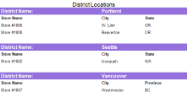
When you complete this walkthrough you get a layout that looks similar to the following at design time and at run time.
Design-Time Layout

Report at design time
Run-Time Layout
Report at run time
To add an ActiveReport to the Visual Studio project
- Create a new Visual Studio project.
- From the Project menu, select Add New Item.
- In the Add New Item dialog that appears, select ActiveReports 14 Page Report and in the Name field, rename the file as CustomCode.
- Click the Add button to open a new fixed page report in the designer.
See Quick Start for information on adding different report layouts.
To connect the report to a data source
- In the Report Explorer, right-click the Data Sources node and select the Add Data Source option or select Data Source from the Add button.
- In the Report Data Source Dialog that appears, select the General page and in the Name field, enter a name like ReportData.
- On this page, create a connection to the Reels database. See Connect to a Data Source for information on connecting to a data source.
To add a dataset
- In the Report Explorer, right-click the data source node and select the Add Data Set option or select Data Set from the Add button.
- In the DataSet Dialog that appears, select the General page and enter the name of the dataset as Districts. This name appears as a child node to the data source icon in the Report Explorer.
- On the Query page of this dialog, in the Query field enter the following SQL query.
SQL Query Copy CodeSELECT Store.StoreName, Address.City, Address.Region AS StateProvince, Address.Country, Districts.District FROM Address INNER JOIN (Districts INNER JOIN Store ON Districts.DistrictID = Store.DistrictID) ON Address.AddressID = Store.Address WHERE NOT Districts.DistrictID = 0 ORDER BY Districts.District
- Click the Validate DataSet icon at the top right hand corner above the Query box to validate the query.

- Click OK to close the dialog. Your data set and queried fields appear as nodes in the Report Explorer.
To create a layout for the report
- From the toolbox, drag the TextBox control onto the design surface and go to the Properties window to set the following properties:
Property Name Property Value Location 0in, 0in Size 6.5in, 0.5in TextAlign Center FontSize 14pt Value District Locations - From the toolbox, drag a Table data region onto the design surface and go to the Properties window to set the DataSetName property to Districts.
- Set the following properties for the table:
Property Name Property Value Location 0in, 0.5in FixedSize 6in, 7in Note: FixedSize property is set only in Page report. - Click inside the table to display the column handles at the top and in the Properties window, set the Width property of following columns:
Column Width TableColumn1 3in TableColumn2 1.5in TableColumn3 1.5in - Click inside the table to display the row handles along the left of the table and right-click any of the row handles to select Insert Group.
- In the Table - Groups dialog that appears, under Group on, select the following expression:
=Fields!District.Value - On the same dialog set the Name to District and click OK to close the dialog. The header and footer rows for the new group appear.
- In the Report Explorer from the Districts dataset, drag the District field into the second column of the group header row of the table. This automatically places an expression in the group header row and simultaneously places a static label in the table header row.
- In the first column of the group header row, just to the left of the District field, in the Properties window set the Value property to District Name:.
- Click the row handle to the left of the group header row to select the entire row and in the Properties window, set the properties as follows:
Property Name Property Value FontSize 12pt FontWeight Bold BackgroundColor MediumPurple Color White - Right-click any row handle to the left of the table and select Table Header to remove the table header.
- Right-click any row handle to the left of the table and select Table Footer to remove the table footer.
- In the Report Explorer, drag the following fields from the Districts dataset onto the detail row of the table as follows.
Field Column StoreName TableColumn1 City TableColumn2 StateProvince TableColumn3 - Remove the static label State Province from the group header for the third column.
- Right-click the row handle for the group header row and select Insert Row Below to add a row for static labels that will appear once for each group.
- In the new row, enter the following values for static label in table columns.
TableColumn1
Property Name Property Value Value Store Name FontWeight Bold TableColumn2
Property Name Property Value Value City FontWeight Bold TableColumn3
Property Name Property Value Value =iif(Fields!Country.Value="USA", "State", "Province") FontWeight Bold Note: The expression in the third column displays the label "State" when the country is USA, and displays "Province" when it is not.
To embed code in a report and reference it in a field expression
This custom code creates a URL to Yahoo!® Maps for each city in the report.
- On the Script tab of the report, enter the following code to create a URL.
Visual Basic.NET code. Add to the Script tab. Copy CodePublic Function MapLink(ByVal Country, ByVal City, ByVal StateProvince) As String Dim Link As String Dim _Country As String = Country.ToString() Dim _City As String = City.ToString() Dim _StateProvince As String = StateProvince.ToString() Select Case _Country Case "USA" Link = "http://maps.yahoo.com/maps_result?addr=&csz=" & _City & "%2C+" & _StateProvince & "&country=us&new=1&name=&qty=" Case "Canada" Link = "http:file://ca.maps.yahoo.com/maps_result?csz=%2C+" & _StateProvince & "&country=ca" Case Else Link = "" End Select Return Link End FunctionNote: Custom code is helpful if you intend to reuse code throughout the report or if code is too complex to use in an expression. Code must be instance based and written in Visual Basic.NET. You can include multiple methods, but if you want to use classes or other .NET languages, create a custom assembly. See Using Script in a Page Report for further details.
To reference embedded code in a field expression
- On the Designer tab of the report, click the detail cell in the second table column (containing the expression
=Fields!City.Value) to select it and under the Properties window, click the Property dialog link. This is a command to open the respective control's dialog. See Properties Window for more on how to access commands. . - In the Textbox - General dialog that appears, go to the Navigation page.
- Select the radio button next to Jump to URL, and enter the following expression in the combo box below it.
= Code.MapLink(Fields!Country.Value, Fields!City.Value, Fields!StateProvince.Value) - Click OK to close the dialog and use the code to create a hyperlink for the field.
To view the report
- Click the preview tab to view the report at design time.
OR
- Open the report in the Viewer. See Windows Forms Viewer for further information.
See Also