ActiveReports 18 .NET Edition
Report Authors: Designer Components / Data Binding / Data Binding in Page/RDLX Reports / Connect to a Data Source / JSON
In This Topic
    JSON
    In This Topic

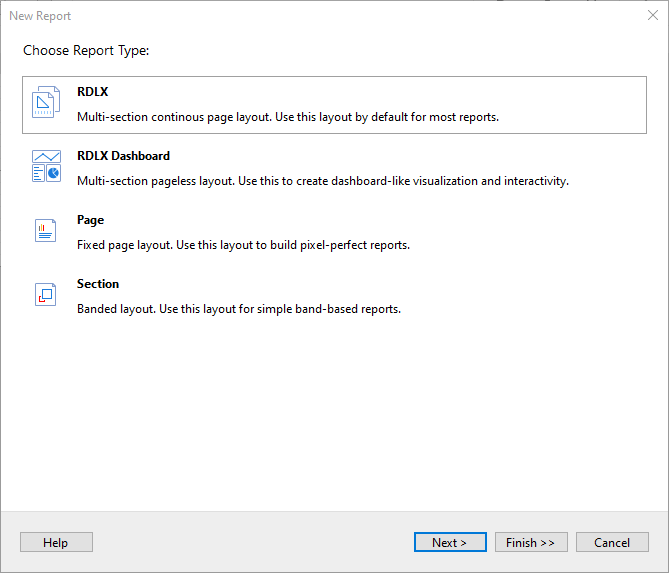
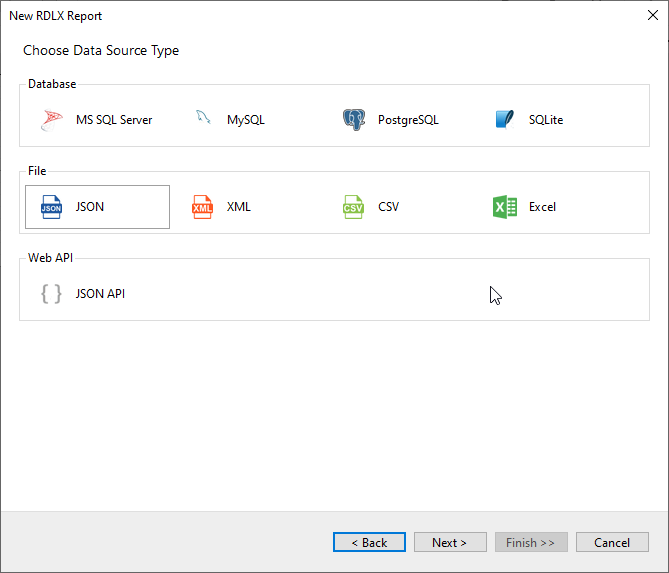
    This article explains connecting a Page or an RDLX report to a JSON data source. You can connect to this data source while creating a new report (via report wizard) or using report explorer (via report data source dialog).

    Connect to JSON Data Source using Report Wizard

    The steps to connect to the JSON data source are:

    1. Create a New Report.
    2. In the New Report dialog, choose the Report Type as RDLX, RDLX Dashboard, or Page and click Next.
      Choose a Report Type from New Report Dialog
    3. Select the Data Source Type as JSON and click Next.
      Select the Data Source Type as JSON
    4. To specify JSON File Path, click the Browse button and navigate to the desired file on your system. For example, you can connect to the 'customer.json' sample data source that can be downloaded from GitHub.
      Specify JSON file path
    5. To specify the runtime connection values, click Parameter to open the Parameters dialog. Then click the Add button to add a new parameter, or select the existing parameter and specify the below details:
      • Name: Specify the name of the parameter.
      • Type: Select the value type (string by default) from the drop-down list.
      • Testing Value: Specify the runtime value for the connection properties.
      • Input Source: Select Interactive for non-hidden parameters and Programmatic for hidden parameters from the drop-down list.
        Parameters Dialog

    6. Click the Next option and configure the dataset by adding a valid query. Select the node from the data tree in the Path section to generate the path. The resulting query is displayed in the Query field.
      Configure the dataset by adding a valid query
    7. On the final screen of the Report Wizard, review the summary of the report and click Finish to successfully add the report with the JSON data source.
      Review and confirm report summary

      Connect to a JSON Data Source using Report Data Source dialog

      1. In the designer, go to the Report Explorer, right-click the Data Sources node and select the Add Data Source option or click the Add button and then select the Data Source option.
      2. In the Report Data Source dialog that appears, select the General page and enter the name of the data source in the Name field. By default, the data source name is set to DataSource1. This name appears as a child node to the Data Sources node in the Report Explorer.
      3. Under the Type field, select Json Provider.
        JSON Provider Data Source
      4. In the Content tab, set the type of Json data to 'External file or URL'.
      5. Click the drop-down icon next to the Select or type the file name or URL field and select the <Browse...> option to specify the json file path, or enter the URL. For example, connect to the 'https://demodata.mescius.io/northwind/odata/v1/Orders' data source.

        The Connection String tab displays the generated connection string as shown below:

            jsondoc=https://demodata.mescius.io/northwind/odata/v1/Orders

        The Configuration Settings are explained in the next section.
      6. Verify the generated connection string by clicking the Validate DataSource icon Validate Icon in Report Data Source Dialog Box.
      7. Click OK to save the changes and close the Report Data Source dialog.

      Configuration Settings

      The JSON Data Provider provides the following configuration settings under the Connection section in the Report Data Source dialog.

      The Content tab describes the type of JSON data you want to use for connecting to a data source. The options available for specifying the JSON data are as follows:

      • External file or URL: Enter the path or URL of an external JSON data file or select the file from the drop-down which displays the JSON files available in the same folder as the report. The connection string generated using this option starts with the keyword jsondoc.
      • Embedded: Enter the path of the JSON data file to embed in the report. You can provide JSON data manually or select a JSON file containing the data. The connection string generated using this option starts with the keyword jsondata.
      • Expression: Enter an expression to bind to the JSON data at runtime.

      The Schema tab describes the options available for specifying the JSON schema in ActiveReports.

      • Auto: This is the default option that auto-generates the JSON schema.
      • External file or URL: Enter the path or URL of an external JSON schema file or select the file from the drop-down which displays the JSON files available in your system. The connection string generated using this option starts with the keyword schemadoc.
      • Embedded: Enter the path of the JSON schema file to embed in the report. You can enter the schema manually or edit the schema in the selected JSON file. The connection string generated using this option starts with the keyword schemadata.
        For generating JSON schema, use the JSON schema generator available at https://jsonschema.net

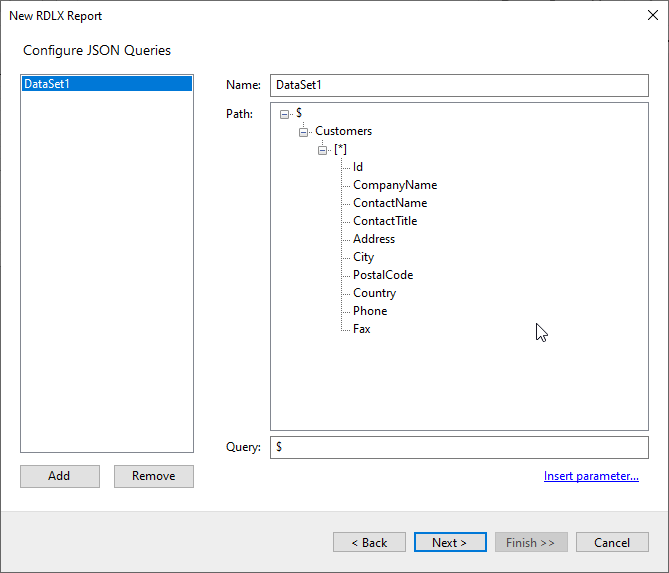
      The JSON schema describes the structure of the JSON data. In ActiveReports, the JSON data provider uses the JSON schema to obtain fields. For more information on JSON schema, please see https://json-schema.org/understanding-json-schema/.
      JSON data provider does not support the following schema keywords, such as:

      • type: Indicates the type of JSON schema element. See here for more information on the type keyword.
      • properties: Indicates the properties collection for JSON schema elements with the object type. See here for more information on properties keyword.
      • items: Indicates the definition of items for JSON schema elements with array type. Only single values are supported.
        For example, "items" : [ {...}, {...}, {...} ] is not supported because it contains multiple values. See here for more information on items keyword.
      • definitions: Indicates the independent definitions which can be used by other JSON schema elements using $ref keyword. See here for more information on definitions keyword.
      • $ref: Indicates the reference to a definition for JSON schema elements with the object type. Only "definitions" ({ $ref : #/definitions/... }) references are supported.

      The Connection String tab displays the JSON connection string based on the defined configuration settings in the Content and Schema tab.
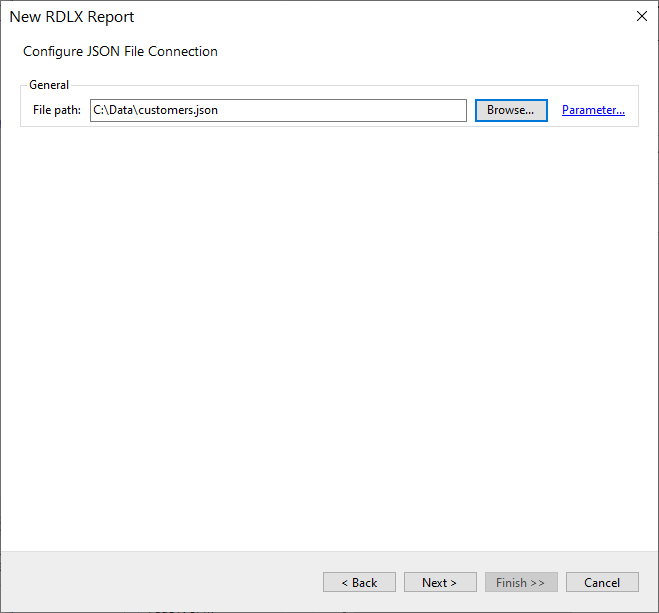
      • If you choose the External file or URL option, the connection string will be as follows -
        jsondoc=C:\customers.json
        or
        jsondoc=https://demodata.mescius.io/northwind/odata/v1/Orders
      • If you choose the Embedded option, the connection string will be generated as follows -
        Connection String
        Copy Code
        jsondata={"Customers":[{"Id":"ALFKI", "CompanyName":"Alfreds Futterkiste", "Country":"Germany"}, {"Id":"ANATR", "CompanyName":"Ana Trujillo Emparedados y helados", "Country":"Mexico"}], "ResponseStatus":{}}
        
      • If you choose the Expression option, the connection string will start with an "equals to" as shown -
               
        Connection String
        Copy Code
        ="jsondata={ 'Name': 'Name'};schemadata={ '$schema': 'http://json-schema.org/draft-04/schema#', 'definitions': {}, 'id': 'http://example.com/example.json', 'properties': { 'Name': { 'id': '/properties/Name', 'type': 'string' } }, 'type': 'object'}"
        
        Caution: If you include an expression in the connection string, use single quotes (') in jsondoc or jsondata and schemadoc or schemadata instead of the double quotes (") .

        For example, the following connection string is invalid:

        Connection String (invalid)
        Copy Code
        ="jsondata={ "Name": "Name"};schemadata={ "$schema": "http://json-schema.org/draft-04/schema#", "definitions": {}, "id": "http://example.com/example.json", "properties": { "Name": { "id": "/properties/Name", "type": "string" } }, "type": "object"}"
        

      Build Connection String

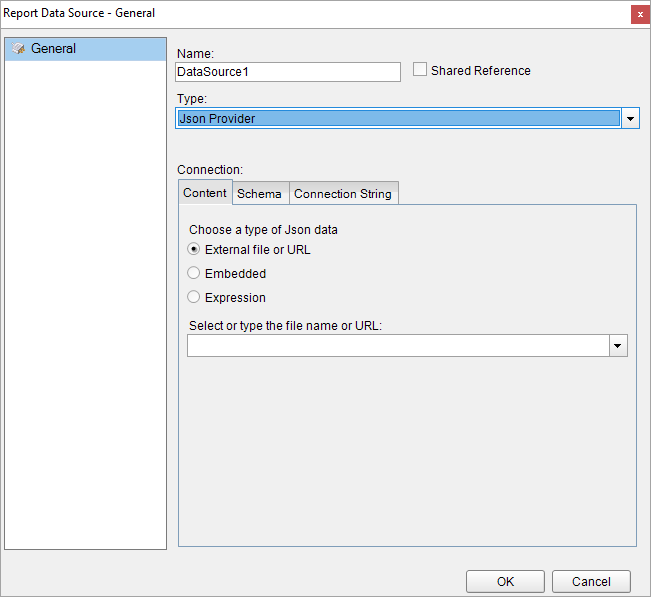
      It is possible to configure the JSON data source connection string by using the Build button in the Connection String tab of the Report Data Source - General dialog. This allows fetching a JSON from an external URL using the specified method (GET, POST) and other request options. Clicking the Build button opens the Configure JSON Data Source dialog where you can create a JSON connection string with parameters such as data path, method (GET, POST), headers, and body.


      To connect to a external URL containing JSON data, some settings are required to be configured as elaborated.

      Data Path:

      The URL or the endpoint of the request consists of service root URI, resource path, and query options. The fields from json provided in the data source's endpoint are extracted depending on the dataset’s settings. A URL with IP address (eg. http://10.64.2.17:51980/admin) or with a machine name (eg. http://in-esxi-w10v17:8080/) is also valid.

      Note: The Data Path must be accurate with a valid URL, else it can not be validated by the builder.


      HTTP Headers:

      Contains additional info related to the request or the response, for eg, provide expected content type necessary for establishing connection with endpoint which must return json. For example, providing credentials to login to a service/URI to retrieve data. Collection editor to add header/value pair for headers is available. This parameter has to be set to send the request body in JSON format.

      Example of Header,Value pairs:

      • Content-Type, application-json (to send the request body in JSON format)

      • Accept, application-json (to read the response in the desired format)


      HTTP Method:

      Request method can be GET (included in URL) or POST (included in 'body').

      Request Body (POST):

      Text area, applicable only in case of POST HTTP request.

      You should provide a valid combination of configuration settings for the successful processing of the connection string with the POST method. If a combination of a valid URL, a valid header name, a valid header value, and a valid body is provided, then the connection string can be saved and validated. Only in this case, it is possible to create a dataset based on this data source.

      If an invalid URL, an invalid header name or header value, invalid body, or a combination of these settings is entered, error message is displayed while validating the connection string.         

      Sample connection strings and dataset queries

      1. Simple

      Connection String
      Copy Code
      jsondoc=https://demodata.mescius.io/northwind/api/v1/Categories
      
      Dataset Query
      Copy Code
      $.[*]


      To convert the format of data in the requested URI to JSON, use either $format query or Http Header as shown in the following connection strings:

      • $format query:
      Connection String
      Copy Code
      jsondoc=https://services.odata.org/v3/northwind/northwind.svc/Invoices?$format=json
      
      •  Http Header:
      Connection String
      Copy Code
      headers={"Accept":"application/json"};jsondoc=https://services.odata.org/v3/northwind/northwind.svc/Invoices
      
      Dataset Query
      Copy Code
      $.value[*]
      

      2. Using Parameters to query specific fields

      Connection String
      Copy Code
      headers={"Accept":"application/json"};jsondoc=https://services.odata.org/v3/northwind/northwind.svc/Invoices?$select=ShipName,ShipRegion
      
      Dataset Query
      Copy Code
      $.value[*]
      

      3. Using Parameters to filter database fields

      Connection String
      Copy Code
      headers={"Accept":"application/json"};jsondoc=https://services.odata.org/v3/northwind/northwind.svc/Invoices?$filter=ShipName eq 'Alfreds%20Futterkiste'
      
      Dataset Query
      Copy Code
      $.value[*]
      
    See Also