Complete the steps below to learn how to create a simple application using the SiteMap control.
The following steps are for an application created on Visual Studio 2012. The steps may be differ slightly based on the version of Visual Studio you use.
 to open the SiteMap Tasks Menu.
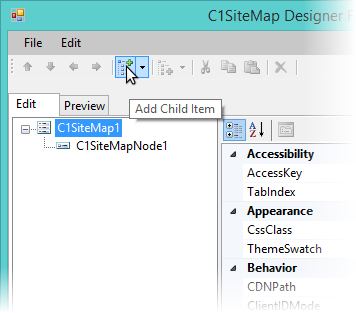
Add the following markup within the <cc1:C1SiteMap></cc1:C1SiteMap>tags, to add nodes to the SiteMap control:
| Markup |
Copy Code
|
|---|---|
<Nodes>
                                        <cc1:C1SiteMapNode runat="server" Text="C1SiteMapNode1" NavigateUrl="Web Form2.aspx">
                           <Nodes>
                                 <cc1:C1SiteMapNode runat="server" NavigateUrl="Web
    Form3.aspx" Text="C1SiteMapNode2">
                                 </cc1:C1SiteMapNode>
                           </Nodes>
                   </cc1:C1SiteMapNode>
                   <cc1:C1SiteMapNode runat="server" Text="C1SiteMapNode3" NavigateUrl="Web Form4.aspx">
                   </cc1:C1SiteMapNode>
</Nodes>
|
|
Add the following code to the Page_Load event, to add nodes to the SiteMap control.
To write code in C#
C1SiteMap1.Nodes.Add(new C1.Web.Wijmo.Controls.C1SiteMap.C1SiteMapNode());
C1SiteMap1.Nodes.Add(new C1.Web.Wijmo.Controls.C1SiteMap.C1SiteMapNode());
C1SiteMap1.Nodes[0].Nodes.Add(new C1.Web.Wijmo.Controls.C1SiteMap.C1SiteMapNode());
C1SiteMap1.Nodes[0].Text = "C1SiteMapNode1";
C1SiteMap1.Nodes[1].Text = "C1SiteMapNode1";
C1SiteMap1.Nodes[0].Nodes[0].Text = "C1SiteMapNode1Child1";
To write code in VB
C1SiteMap1.Nodes.Add(New C1.Web.Wijmo.Controls.C1SiteMap.C1SiteMapNode())
C1SiteMap1.Nodes.Add(New C1.Web.Wijmo.Controls.C1SiteMap.C1SiteMapNode())
C1SiteMap1.Nodes(0).Nodes.Add(New C1.Web.Wijmo.Controls.C1SiteMap.C1SiteMapNode())
C1SiteMap1.Nodes(0).Text = "C1SiteMapNode1"
C1SiteMap1.Nodes(1).Text = "C1SiteMapNode1"
C1SiteMap1.Nodes(0).Nodes(0).Text = "C1SiteMapNode1Child1"
When you run the project, C1SiteMapNodes appear as shown in the image below. SiteMapNode1 and SiteMapNode3 are at level0, whereas SiteMapNode2 is a level1 node.

Another way of changing the layouts for different levels of nodes is through the C1SiteMapLevelSetting Collection Editor. Complete the following steps, to change layouts using the C1SiteMapLevelSetting Collection Editor.
Add the following markup within the <cc1:C1SiteMap></cc1:C1SiteMap>tags, to change the Layout of Level 0 (Default Level) and Level 1 nodes:
| Markup |
Copy Code
|
|---|---|
<LevelSettings>
                 <cc1:C1SiteMapLevelSetting Level="1" SeparatorText="," Layout="Flow">
                 </cc1:C1SiteMapLevelSetting>
         </LevelSettings>
         <DefaultLevelSetting SeparatorText=" ||">
                 <ListLayout RepeatColumns="2" />

         </DefaultLevelSetting>
|
|
Add the following code to the Page_Load event, to modify DefaultLevel settings and to add a new level setting.
To write code in C#
// Add a new LevelSetting
C1SiteMap1.LevelSettings.Add(new C1.Web.Wijmo.Controls.C1SiteMap.C1SiteMapLevelSetting());

// Customize LevelSetting
C1SiteMap1.LevelSettings[0].Level = 1;
C1SiteMap1.LevelSettings[0].Layout = C1.Web.Wijmo.Controls.C1SiteMap.SiteMapLayoutType.Flow;
C1SiteMap1.LevelSettings[0].SeparatorText = ",";

// Customize DefaultLevelSetting
C1SiteMap1.DefaultLevelSetting.Level = 0;
C1SiteMap1.DefaultLevelSetting.Layout = C1.Web.Wijmo.Controls.C1SiteMap.SiteMapLayoutType.List;
C1SiteMap1.DefaultLevelSetting.ListLayout.RepeatColumns = 2;
To write code in Visual Basic
' Add a new LevelSetting
C1SiteMap1.LevelSettings.Add(New C1.Web.Wijmo.Controls.C1SiteMap.C1SiteMapLevelSetting())
' Customize LevelSetting
C1SiteMap1.LevelSettings(0).Level = 1
C1SiteMap1.LevelSettings(0).Layout = C1.Web.Wijmo.Controls.C1SiteMap.SiteMapLayoutType.Flow
C1SiteMap1.LevelSettings(0).SeparatorText = ","
' Customize DefaultLevelSetting
C1SiteMap1.DefaultLevelSetting.Level = 0
C1SiteMap1.DefaultLevelSetting.Layout = C1.Web.Wijmo.Controls.C1SiteMap.SiteMapLayoutType.List
C1SiteMap1.DefaultLevelSetting.ListLayout.RepeatColumns = 2
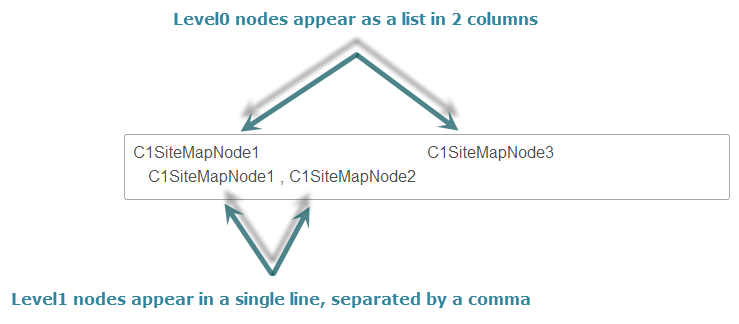
Press F5 to run the project and observe that all Level1 nodes appear in a Flow layout with a separator, whereas all Level0 nodes appear as a List in two columns.