RadialMenu Tutorial Step 2 of 3: Adding the Second Menu and Submenu Items
In This Topic
In this step, you will add submenu items to the existing Products menu.
- In the RadialMenu properties window click on the ellipsis button next to the Items property. The RadialMenuBaseItem Collection Editor appears.
- Select radialMenuItem2 from the Members list and set its Name property to rmiProducts and Text property to Products.
- Click on ellipsis button next to the Items property. The RadialMenuBaseItem Collection Editor appears.
- Click on the Add dropdown button and select RadialMenuItem. Repeat this so there are 6 RadialMenuItems.
- Select the first member, radialMenuItem2, and set its Image property to ultLogo_32, ToolTip property to Studio Ultimate, and Name property to rmiStuUlt.
- Select the second member, radialMenuItem7, and set its Image property to seLogo_32, ToolTip property to Studio Enterprise, and Name property to rmiStuEnt.
- Select the third member, radialMenuItem8, and set its Image property to c1powersuite_logo_32, ToolTip property to Enterprise-ready reporting and spreadsheets controls for .NET applications, and its Name property to rmiStuPower.
- Select the fourth member, radialMenuItem9, and set its Image property to winformsLogo_321, Tooltip property to Studio for WinForms, and its Name property to rmiStuWinForms.
- Select the fifth member, radialMenuItem10, and set its Image property to wpfLogo_32, ToolTip property to Studio for WPF, and its Name property to rmiStuWPF.
- Select the sixth member, radialMenuItem11, and set its Image property to aspLogo_32, ToolTip property to Studio for ASP.NET Wijmo, and Name property to rmiStuWijmo.
- Click OK to save and close the RadialMenuItemBase Collection Editor.
- Click OK to save and close the RadialMenuItemBase Collection Editor.
- Run your project and observe the following:
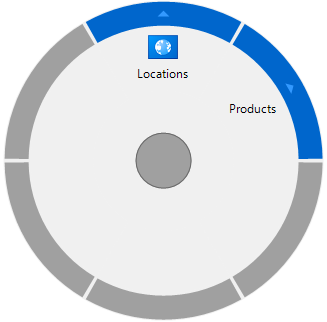
Notice the second RadialMenuItem, Products, is added. Click on the Products menu and its submenu items appear like the following:
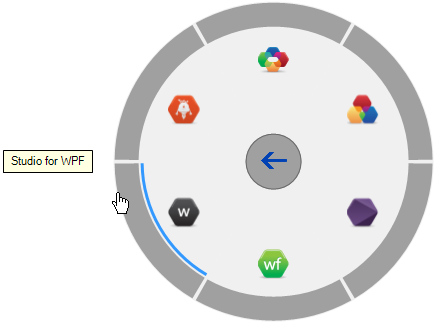
Notice when you hover over a menu item its tooltip appears. To navigate back to the main Radial menu, click on the back button.
See Also