This topic uses data binding and multiple ranges to demonstrate how to use gauges to display poll results. The colored ranges make the results easy to understand. Some corresponding colored labels are also added to display the names of the candidates/political parties.
This topic comprises of four steps:
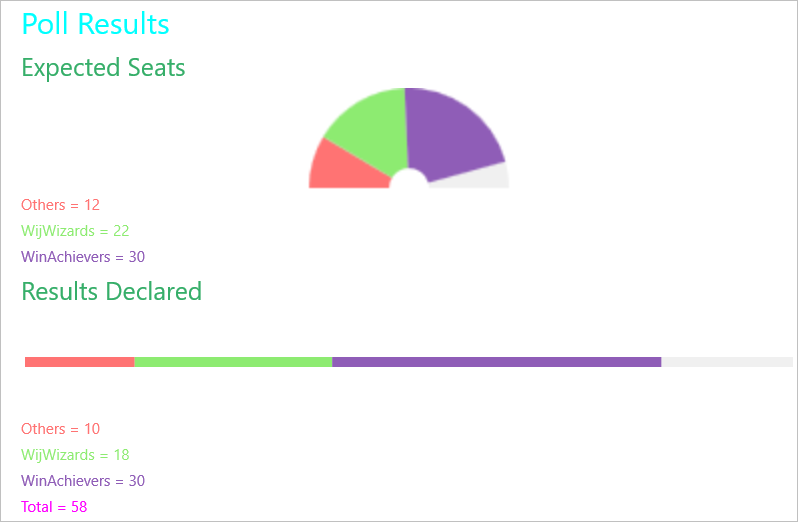
The following image shows how the controls appear after completing the steps above.
The following class can be used to bind gauges to data.
| C# |
Copy Code
|
|---|---|
class ElectionData { double others, wijWizards, winAchievers; public double Others { get { return others; } set { others = value; } } public double WijWizards { get { return wijWizards; } set { wijWizards = value; } } public double WinAchievers { get { return winAchievers; } set { winAchievers = value; } } |
|
Complete the following steps to add a radial gauge to display the expected seats and a linear gauge to display the results declared. Add labels below the gauges to display the names of the parties and their seat count.
| XAML |
Copy Code
|
|---|---|
<ContentPage xmlns="http://xamarin.com/schemas/2014/forms" xmlns:x="http://schemas.microsoft.com/winfx/2009/xaml" x:Class="Appl.ElectionResult" xmlns:c1="clr-namespace:C1.Xamarin.Forms.Gauge;assembly=C1.Xamarin.Forms.Gauge"> |
|
| Example Title |
Copy Code
|
|---|---|
<StackLayout>
    <Label Text="Poll Results" TextColor="Aqua"  Font="30" />
    <Label Text="Expected Seats" TextColor="#36ae69" Font="25"/>
    <!--Radial Gauge-->
    <c1:C1RadialGauge x:Name="gauge"  Min="0" Max="70" ShowText="None" AutoScale = "true" ShowRanges="True">

        <!--Colored ranges to represent parties-->
        <c1:C1RadialGauge.Ranges>
            <c1:GaugeRange x:Name="Range1" Color="#FF7373"/>
            <c1:GaugeRange x:Name="Range2"  Color="#8DEB71"/>
            <c1:GaugeRange x:Name="Range3"  Color="#8F5DB7"/>
        </c1:C1RadialGauge.Ranges>
    </c1:C1RadialGauge>

    <!--Labels to display party names and seat count-->
    <Label x:Name="lbl" TextColor="#FF7373"/>
    <Label x:Name="lbl1" TextColor="#8DEB71"/>
    <Label x:Name="lbl2" TextColor="#8F5DB7"/>
    <Label Text="Results Declared" TextColor="#36ae69" Font="25"/>

    <!--Linear Gauge-->
    <c1:C1LinearGauge x:Name="lGauge"  Min="0" Max="70" Thickness="0.1"  Direction="Right" ShowRanges="True">

        <!--Colored ranges to represent parties-->
        <c1:C1LinearGauge.Ranges>
            <c1:GaugeRange x:Name="lRange1"  Color="#FF7373"/>
            <c1:GaugeRange x:Name="lRange2"  Color="#8DEB71"/>
            <c1:GaugeRange x:Name="lRange3"  Color="#8F5DB7"/>
        </c1:C1LinearGauge.Ranges>
    </c1:C1LinearGauge>

    <!--Labels to display party names and seat count-->
    <Label x:Name="llbl" TextColor="#FF7373"/>
    <Label x:Name="llbl1" TextColor="#8DEB71"/>
    <Label x:Name="llbl2" TextColor="#8F5DB7"/>
    <Label x:Name="llbl4" TextColor="Fuchsia"/>
<StackLayout/>
|
|
Complete the following steps to add data to gauges and labels.
The following code shows what the ElectionResult class constructor looks like after completing this step.
| C# |
Copy Code
|
|---|---|
// Results Declared ElectionData bds = new ElectionData() { Others = 10, WijWizards = 18, WinAchievers = 30 }; lRange1.Min = 0; lRange1.Max = lRange1.Min + bds.Others; lRange2.Min = lRange1.Max; lRange2.Max = lRange2.Min + bds.WijWizards; lRange3.Min = lRange2.Max; lRange3.Max = lRange3.Min + bds.WinAchievers; // Add data to labels llbl.Text = "Others = " + bds.Others; llbl1.Text = "WijWizards = " + bds.WijWizards; llbl2.Text = "WinAchievers = " + bds.WinAchievers; llbl4.Text = "Total = " + (bds.Others + bds.WijWizards + bds.WinAchievers).ToString(); // Expected Seats ElectionData ds = new ElectionData() { Others = 12, WijWizards = 22, WinAchievers = 30 }; Range1.Min = 0; Range1.Max = Range1.Min + ds.Others; Range2.Min = Range1.Max; Range2.Max = Range2.Min + ds.WijWizards; Range3.Min = Range2.Max; Range3.Max = Range3.Min + ds.WinAchievers; // Add data to labels lbl.Text = "Others = " + ds.Others; lbl1.Text = "WijWizards = " + ds.WijWizards; lbl2.Text = "WinAchievers = " + ds.WinAchievers; |
|
Complete the following steps
The following code shows the class constructor App( ), after completing this step.
| C# |
Copy Code
|
|---|---|
public App() { // The root page of your application MainPage = new ElectionResult(); } |
|
| C# |
Copy Code
|
|---|---|
C1.Xamarin.Forms.Gauge.Platform.iOS.C1GaugeRenderer.Init(); |
|
| C# |
Copy Code
|
|---|---|
C1.Xamarin.Forms.Gauge.Platform.UWP.C1GaugeRenderer.Init(); |
|