You can form outlines of one or more rows or columns. There are several methods that create an outline (range group) such as the AddRangeGroup method for the SheetView class.
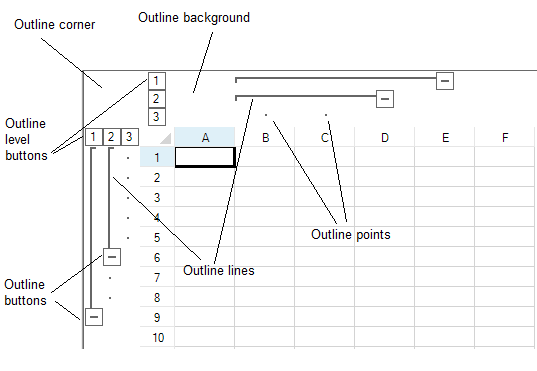
The outline appears at the left (for rows) and top (for columns) of the spreadsheet beyond the headers. Outlines can be nested, creating levels of outlines. The numbered boxes that appear in the outline area allow you to expand or collapse all the outlines of that level. You can expand and collapse rows and columns by clicking on the expand and collapse icons or on the numbered outline headers.
The figure below shows three levels of outline for rows and columns, and shows the terminology of the parts of the outline area.
This example creates two column outline groups.
| C# |
Copy Code
|
|---|---|
fpSpread1.ActiveSheet.Rows.Count = 11; fpSpread1.ActiveSheet.Columns.Count = 6; fpSpread1.InterfaceRenderer = null; fpSpread1.ActiveSheet.RangeGroupBackgroundColor = Color.LightGreen; fpSpread1.ActiveSheet.RangeGroupButtonStyle = FarPoint.Win.Spread.RangeGroupButtonStyle.Enhanced; fpSpread1.ActiveSheet.AddRangeGroup(0, 8, true); fpSpread1.ActiveSheet.AddRangeGroup(0, 5, true); fpSpread1.ActiveSheet.AddRangeGroup(1, 3, false); fpSpread1.ActiveSheet.AddRangeGroup(1, 2, false); |
|
| VB |
Copy Code
|
|---|---|
fpSpread1.ActiveSheet.Rows.Count = 11 fpSpread1.ActiveSheet.Columns.Count = 6 fpSpread1.InterfaceRenderer = Nothing fpSpread1.ActiveSheet.RangeGroupBackgroundColor = Color.LightGreen fpSpread1.ActiveSheet.RangeGroupButtonStyle = FarPoint.Win.Spread.RangeGroupButtonStyle.Enhanced fpSpread1.ActiveSheet.AddRangeGroup(0, 8, True) fpSpread1.ActiveSheet.AddRangeGroup(0, 5, True) fpSpread1.ActiveSheet.AddRangeGroup(1, 3, False) fpSpread1.ActiveSheet.AddRangeGroup(1, 2, False) |
|
You can hide the outline area by using the ShowOutline property of the FpSpread class. It accepts RowCol enumeration values as Both (Default), Rows, Columns or None.
The following example shows the rows outline and hides the columns outline.
| C# |
Copy Code
|
|---|---|
fpSpread1.ActiveSheet.AddRangeGroup(0, 8, true); fpSpread1.ActiveSheet.AddRangeGroup(1, 3, false); // Show only rows outline fpSpread1.ShowOutline = FarPoint.Win.Spread.RowCol.Rows; |
|
| Visual Basic |
Copy Code
|
|---|---|
fpSpread1.ActiveSheet.AddRangeGroup(0, 8, true) fpSpread1.ActiveSheet.AddRangeGroup(1, 3, false) 'Show only rows outline fpSpread1.ShowOutline = FarPoint.Win.Spread.RowCol.Rows |
|