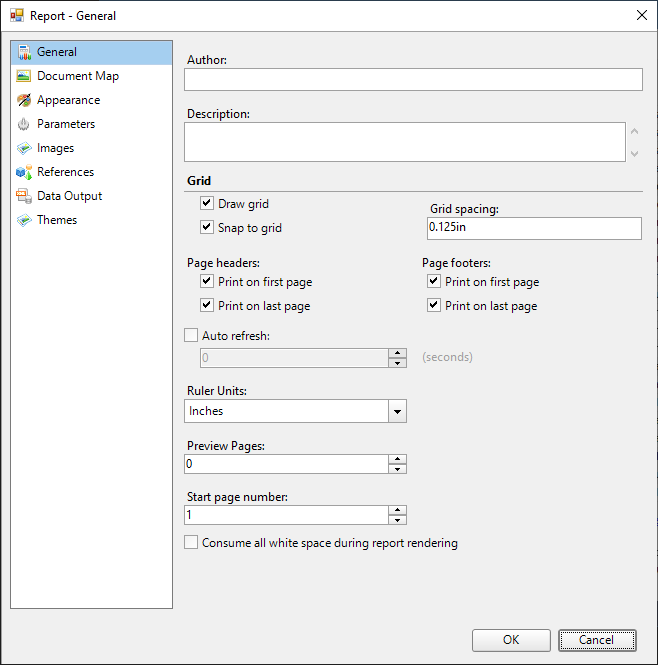
The General page of the Report dialog allows you to control the following items:
- Author: Enter the name of the report author here.
- Description: Enter a description of the report here.
- Draw grid: Clear this check box to remove the grid lines from the report design surface.
- Snap to grid: Clear this check box to allow free placement of report items on the report design surface instead of the automatic alignment of report items with grid lines.
- Grid spacing: Enter the spacing between grid lines in inches. The default value is 0.125 inches.
-
Page headers: These options are enabled when you set a Page Header in a Report Definition Language () report.
- Print on first page - Select this check box to set the page header on the first page of the report.
- Print on last page - Select this check box to set the page header on the last page of the report.
-
Page footers: These options are enabled when you set a Page Footer in a report.
- Print on first page - Select this check box to set the page footer on the first page of the report.
- Print on last page - Select this check box to set the page footer on the last page of the report.
- Auto refresh: Select this check box to automatically refresh the pages of the report at regular intervals. When this check box is selected, you can supply the interval in seconds.
- Ruler Units: Set the ruler units in Inches or Centimeters.
- Preview Pages: Set the number of pages to display in the Preview tab. Minimum values is 0 and maximum is 10000 pages. If the value is set to 0, the Preview tab displays all the pages. By default, the Preview tab displays all the pages.
- Start page number: Set the number from which the page numbering should start.
- Consume all white space during report rendering: In RDLX report, selecting this option consumes all white spaces in report during report rendering.
The Document Map page of the Report dialog allows you to control the following items:
- Source: The document map source. You can choose the source as Labels, Headings, or both Labels and Headings.
- Numbering Style: Specifies numbering style for headings like 1, 2, 3, 4 or a, b, c, d, etc.
See Document Map for more information.
The Appearance page of the Report dialog allows you to control the page layout for your report.
Columns (in RDLX reports)
- Number of columns: Enter the number of columns you want to use in your report.
- Spacing: Enter the number of inches of space to use between columns.
Page Layout
- Paper Size: Select one among the standard paper sizes from the dropdown.
- Width: Specify the width of the layout.
- Height: Specify the height of the layout.
- Left margin: Specify the Left margin for the layout.
- Right margin: Specify the Right margin for the layout.
- Top margin: Specify the Top margin for the layout.
- Bottom margin: Specify the Bottom margin for the layout.
- Orientation: Select one among Portrait and Landscape as your page orientation.
- Pages layout order: See Set Page Layout in Z- or N-Order for more information.
Z-order: Horizontally expanding data in the report is rendered first on the upcoming pages followed by the vertically expanding data.
N-order: Vertically expanding data in the report is rendered first on the upcoming pages followed by the horizontally expanding data.
Design
- Output background only at design-time: Select the checkbox to display background (for example, background image or background color) in the design tab only.
Stylesheet
- Source: Select one among Embedded and External as your style sheet source.
-
Value: Select the style sheet to apply to the report. Following options are available:
Expression - opens the Expression Editor dialog to set an expression.
New - opens the New Stylesheet Editor dialog for creating an external or embedded style sheet.
Open file - opens the Open Stylesheet from file dialog for navigating to a local style sheet file. This option is only available for external style sheets.
In case of embedded style sheets, a list of available style sheets in the report is provided.
The Parameters page of the Report dialog allows you to control how a user interface is presented to your users for each parameter. See Parameters for further information.
The Images page of the Report dialog allows you to add and modify images for your report. Click the Open button located at the top left of the page to display the Open file dialog, where you can navigate to an image. Once you select an image file and click the Open button, a thumbnail of the image is displayed in the Image column, and the Name and MIME Type values are automatically populated in their respective columns.
You can use the images you add here in the Image control. The MIME Type column provides a combo-box with a list of image file extensions, where you can change default file filter of the added image.
You can also use the Remove button located at the top right of the page to remove any added image.
The References page of the Report dialog allows you to add references to assemblies and classes so that you can call methods from them in expressions throughout your report. You can also access the References dialog from the Properties Panel by selecting the Classes (Collection) or References (Collection) property of a report and clicking the ellipsis button that appears.
Assembly Name
This is a list of the assemblies available for use in your report. You can delete assemblies using the Remove button, or add them using the Open button which presents the Open file dialog.
Classes
This is a list of instance-based classes you can create for use in your report.
- Class name: Enter the namespace and name of the class here. (i.e. Invoicing.GetDueDate)
- Instance name: Enter a name for the instance of the class here. (i.e. m_myGetDueDate)
The Data Output page of the Report dialog allows you to control how the report's data is rendered in XML exports.
- Element name: Enter the name you want to appear as the top level data element in your exported XML file.
- Data transform (.xsl file): Enter the name of the XSL file you want to use as a style sheet for the exported XML file.
- Data schema: Enter the schema or namespace to use for validating data types in the exported XML file.
-
Render textboxes as: Choose whether to render textboxes as Attributes or Elements in the exported XML file.
- Attributes example:
<table1 textbox3="Report created on: 7/26/2005 1:13:00 PM">
- Elements example:
<table1> <textbox3>Report created on: 7/26/2005 1:13:28 PM</textbox3>
The Themes page of the Report dialog displays the report's themes. This dialog allows you to create a new theme, add, modify or remove an existing one, as well as rearrange the order of themes if a report has many themes. When you select to create or modify a theme, the Theme Editor is opened. See Themes for further information.