Spread for WinForms supports adding comments to cells in a worksheet. You can add a plain text comment or note by referring to the Adding a Note to a Cell topic.
Additionally, you can enable the EnhancedShapeEngine property to add a string or RichText instances by using the IRange.AddComment method.
You can modify the added comment by using the IRange.Comment property. For example, the image below shows a default comment as well as a customized comment. The customized comment is set to always be visible and has shape properties such as background color, shape border style, and border color.

The following code shows how to set comments.
| C# |
Copy Code
|
|---|---|
// Get activesheet GrapeCity.Spreadsheet.IWorksheet TestActiveSheet = fpSpread1.AsWorkbook().ActiveSheet; // Enable enhanced shape engine fpSpread1.Features.EnhancedShapeEngine = true; string username = "Admin" + ":"; // Initilize richtext object GrapeCity.Spreadsheet.RichText richText = new GrapeCity.Spreadsheet.RichText(username + "\r\nThis is a rich text \r\nsupported comment"); // Setting style GrapeCity.Spreadsheet.Font font = GrapeCity.Spreadsheet.Font.Empty; font.Bold = true; GrapeCity.Spreadsheet.Font font2 = GrapeCity.Spreadsheet.Font.Empty; font2.Italic = true; font2.Underline = GrapeCity.Spreadsheet.UnderlineStyle.Double; // Adding style to rich text richText.Format(0, username.Length, font); richText.Format(17, 9, font2); // Adding a comment to cell GrapeCity.Spreadsheet.IComment comment = TestActiveSheet.Cells["B2"].AddComment(richText); // Customizing comment style TestActiveSheet.Cells["B2"].Comment.Visible = true; // Always show comment TestActiveSheet.Cells["B2"].Comment.Shape.Fill.BackColor.ARGB = Color.Orange.ToArgb(); // Change comment background color TestActiveSheet.Cells["B2"].Comment.Shape.Line.Style = GrapeCity.Drawing.LineStyle.ThickThin; // Change border style TestActiveSheet.Cells["B2"].Comment.Shape.Line.Weight = 5; // Change border thickness TestActiveSheet.Cells["B2"].Comment.Shape.Line.ForeColor.ARGB = Color.DeepSkyBlue.ToArgb(); // Change border color |
|
| VB |
Copy Code
|
|---|---|
'Get activesheet Dim TestActiveSheet As GrapeCity.Spreadsheet.IWorksheet = FpSpread1.AsWorkbook().ActiveSheet 'Enable enhanced shape engine FpSpread1.Features.EnhancedShapeEngine = True Dim username As String = "Admin" & ":" 'Initilize richtext object Dim richText As GrapeCity.Spreadsheet.RichText = New GrapeCity.Spreadsheet.RichText(username & vbCrLf & "This is a rich text " & vbCrLf & "supported comment") 'Setting style Dim font As GrapeCity.Spreadsheet.Font = GrapeCity.Spreadsheet.Font.Empty font.Bold = True Dim font2 As GrapeCity.Spreadsheet.Font = GrapeCity.Spreadsheet.Font.Empty font2.Italic = True font2.Underline = GrapeCity.Spreadsheet.UnderlineStyle.Double 'Adding style to rich text richText.Format(0, username.Length, font) richText.Format(17, 9, font2) 'Adding a comment to cell Dim comment As GrapeCity.Spreadsheet.IComment = TestActiveSheet.Cells("B2").AddComment(richText) 'Customizing comment style TestActiveSheet.Cells("B2").Comment.Visible = True 'Always show comment TestActiveSheet.Cells("B2").Comment.Shape.Fill.BackColor.ARGB = Color.Orange.ToArgb() 'Change comment background color TestActiveSheet.Cells("B2").Comment.Shape.Line.Style = GrapeCity.Drawing.LineStyle.ThickThin 'Change border style TestActiveSheet.Cells("B2").Comment.Shape.Line.Weight = 5 'Change border thickness TestActiveSheet.Cells("B2").Comment.Shape.Line.ForeColor.ARGB = Color.DeepSkyBlue.ToArgb() 'Change border color |
|
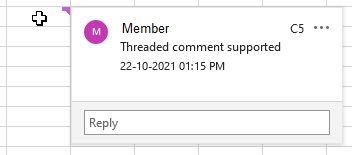
Users can view threaded comments in the Spread UI. This helps in connecting several comments together and presenting a virtual conversation in the workbook.
Using Code
You can add threaded comments by using the IRange.AddCommentThreaded method.
| C# |
Copy Code
|
|---|---|
// Threaded comments fpSpread1.LegacyBehaviors = LegacyBehaviors.None; fpSpread1.Features.EnhancedShapeEngine = true; fpSpread1.AsWorkbook().TestActiveSheet.Cells["C5"].AddCommentThreaded("Threaded comment supported").AddReply("First reply"); |
|
| VB |
Copy Code
|
|---|---|
' Threaded comments FpSpread1.LegacyBehaviors = LegacyBehaviors.None FpSpread1.Features.EnhancedShapeEngine = True FpSpread1.AsWorkbook().TestActiveSheet.Cells("C5").AddCommentThreaded("Threaded comment supported").AddReply("First reply") |
|
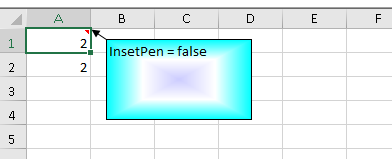
You can add gradient effects to emphasize the comments by applying fill-color and patterns.
Using Code
To add the gradient effects, use the Fill property of the IShapeBase interface, which gets an object of the IFillFormat interface for a specified shape that contains the fill formatting properties for shape.
| C# |
Copy Code
|
|---|---|
fpSpread1.Features.EnhancedShapeEngine = true; IWorksheet TestActiveSheet = fpSpread1.AsWorkbook().ActiveSheet; IShape shape; shape = TestActiveSheet.Cells["A1"].AddComment("InsetPen = false").Shape; TestActiveSheet.Cells["A1"].Comment.Visible = true; shape.Fill.OneColorGradient(GrapeCity.Spreadsheet.Drawing.GradientStyle.FromCenter, 1, 1); shape.Fill.GradientStops.Delete(0); shape.Fill.GradientStops.Delete(0); shape.Fill.GradientStops.Delete(0); shape.Fill.GradientStops.Insert(0xffff00, 0); shape.Fill.GradientStops.Insert(0xffffff, 0.5); shape.Fill.GradientStops.Insert(0x00ffff, 1); shape.Fill.GradientStops[0].Color.SchemeColor = 23; shape.Fill.PathShadeType = GrapeCity.Drawing.PathShadeType.Shape; IShape aa = fpSpread1.AsWorkbook().ActiveSheet.Cells["A1"].Comment.Shape; |
|
| VB |
Copy Code
|
|---|---|
FpSpread1.Features.EnhancedShapeEngine = True IWorksheet TestActiveSheet = FpSpread1.AsWorkbook().ActiveSheet Dim shape As IShape shape = TestActiveSheet.Cells("A1").AddComment("InsetPen = false").Shape TestActiveSheet.Cells("A1").Comment.Visible = True shape.Fill.OneColorGradient(GrapeCity.Spreadsheet.Drawing.GradientStyle.FromCenter, 1, 1) shape.Fill.GradientStops.Delete(0) shape.Fill.GradientStops.Delete(0) shape.Fill.GradientStops.Delete(0) shape.Fill.GradientStops.Insert(0xffff00, 0) shape.Fill.GradientStops.Insert(0xffffff, 0.5) shape.Fill.GradientStops.Insert(0x00ffff, 1) shape.Fill.GradientStops(0).Color.SchemeColor = 23 shape.Fill.PathShadeType = GrapeCity.Drawing.PathShadeType.Shape Dim aa As IShape = FpSpread1.AsWorkbook().ActiveSheet.Cells("A1").Comment.Shape |
|
Using Runtime UI
You can add or manipulate gradient fill effects at run time via the Fill Effects dialog. The Fill Effects dialog provides options like colors, variants, shading styles, patterns, and a sample preview to view the gradient effect.
To invoke the dialog at runtime, select the comment on the sheet and use the keyboard shortcut keys combination Ctrl+1, or select the Format Comment option from the built-in context menu.
In the Format Comments dialog, navigate to the Colors and Lines tab and select the Fill Effects option from the Color picker dropdown to view the Fill Effects dialog.
You can also invoke the Fill Effects dialog at runtime using the FillEffects method of the BuiltInDialogs class. To learn more about this class, see Working with BuiltIn Dialogs.
Using Spread Designer
To view comments and add gradient effects to the block in the Spread Designer, follow the below mentioned steps:
Formatting text in the comments is helpful for customizing the appearance and readability of comments or notes in the worksheet, allowing you to visually display your annotations in a more appealing way. Usually, Spread allows you to orient the text horizontally or vertically. However, using the HorizontalRotatedFarEast property of TextOrientation enumeration, you can control the orientation and formatting of text within cell comments. This property allows you to stack text vertically.

Using code
The following example code shows how to change text orientation in cell comments.
| C# |
Copy Code
|
|---|---|
// Add support paint stacked text direction for cell comment fpSpread1.Features.EnhancedShapeEngine = true; var activeSheet = fpSpread1.AsWorkbook().ActiveSheet; var comment = activeSheet.Cells["A1"].AddComment("Vertical\n text"); comment.Shape.TextFrame.Orientation = GrapeCity.Spreadsheet.Drawing.TextOrientation.HorizontalRotatedFarEast; comment.Shape.TextFrame.WordWrap = true; comment.Shape.Height = 200; comment.Visible = true; var comment2 = activeSheet.Cells["C1"].AddComment("Vertical text in comment"); comment2.Shape.TextFrame.Orientation = GrapeCity.Spreadsheet.Drawing.TextOrientation.HorizontalRotatedFarEast; comment2.Shape.TextFrame.WordWrap = true; comment2.Shape.Height = 200; comment2.Visible = true; var comment3 = activeSheet.Cells["E1"].AddComment("abc"); comment3.Shape.TextFrame.Orientation = GrapeCity.Spreadsheet.Drawing.TextOrientation.HorizontalRotatedFarEast; comment3.Shape.TextFrame.HorizontalAlignment = GrapeCity.Spreadsheet.HorizontalAlignment.Justify; comment3.Shape.TextFrame.VerticalAlignment = GrapeCity.Spreadsheet.VerticalAlignment.Justify; comment3.Shape.Height = 40; comment3.Visible = true; |
|
| VB |
Copy Code
|
|---|---|
' Add support paint stacked text direction for cell comment FpSpread1.Features.EnhancedShapeEngine = True Dim activeSheet = FpSpread1.AsWorkbook().ActiveSheet Dim comment = activeSheet.Cells("A1").AddComment("Vertical" & vbLf & " text") comment.Shape.TextFrame.Orientation = GrapeCity.Spreadsheet.Drawing.TextOrientation.HorizontalRotatedFarEast comment.Shape.TextFrame.WordWrap = True comment.Shape.Height = 200 comment.Visible = True Dim comment2 = activeSheet.Cells("C1").AddComment("Vertical text in comment") comment2.Shape.TextFrame.Orientation = GrapeCity.Spreadsheet.Drawing.TextOrientation.HorizontalRotatedFarEast comment2.Shape.TextFrame.WordWrap = True comment2.Shape.Height = 200 comment2.Visible = True Dim comment3 = activeSheet.Cells("E1").AddComment("abc") comment3.Shape.TextFrame.Orientation = GrapeCity.Spreadsheet.Drawing.TextOrientation.HorizontalRotatedFarEast comment3.Shape.TextFrame.HorizontalAlignment = GrapeCity.Spreadsheet.HorizontalAlignment.Justify comment3.Shape.TextFrame.VerticalAlignment = GrapeCity.Spreadsheet.VerticalAlignment.Justify comment3.Shape.Height = 40 comment3.Visible = True |
|
At Runtime
Using the Format Comment dialog, you can change the orientation of the comments you have added to cells. To invoke the dialog at runtime, perform the following steps:
| C# |
Copy Code
|
|---|---|
fpSpread1.Features.EnhancedShapeEngine = true; var activeSheet = fpSpread1.AsWorkbook().ActiveSheet; var comment = activeSheet.Cells["A1"].AddComment("Vertical text"); comment.Shape.TextFrame.Orientation = GrapeCity.Spreadsheet.Drawing.TextOrientation.HorizontalRotatedFarEast; comment.Visible = true; |
|
| VB |
Copy Code
|
|---|---|
FpSpread1.Features.EnhancedShapeEngine = True Dim activeSheet = FpSpread1.AsWorkbook().ActiveSheet Dim comment = activeSheet.Cells("A1").AddComment("Vertical text") comment.Shape.TextFrame.Orientation = GrapeCity.Spreadsheet.Drawing.TextOrientation.HorizontalRotatedFarEast comment.Visible = True |
|
