CheckBox Control in Reports
In This Topic
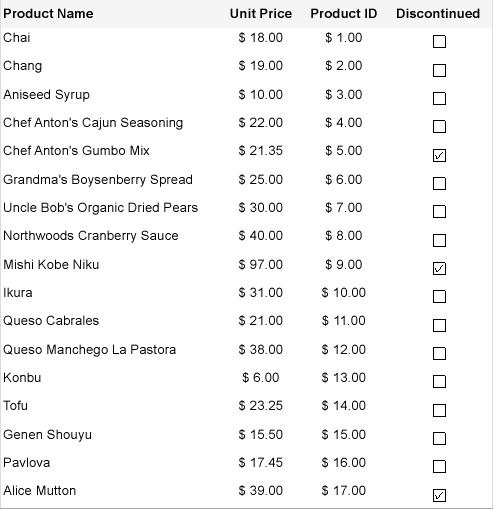
Let us create a report that displays information on Products that are 'Discontinued' in a Table data region. Since the value of 'Discontinued' is either True (1) or False (0), and a CheckBox control takes the Boolean value, we will use it to show the 'Tick' marks corresponding to the 'True' values. The report connects to the 'Products_header_tab.csv' data source available on GitHub.
The final report will look as shown.

Create a Report
In the ActiveReports Designer, create a new Page or an RDLX report.
If you are creating a new report in the Visual Studio Integrated Designer, see
Quick Start.
Bind Report to Data
As you create a new report, you can configure the report data connection in the Report Wizard. You can also access tht Report Data Source dialog by right-clicking the Data Sources node in the Report Explorer and then selecting the Add Data Source option. See CSV for details.
- On the Choose Data Source Type screen of the wizard, select CSV and click Next.
- To specify the File Path, click the Browse button and navigate to the desired folder on your system. For example, you can connect to the Products_header_tab.csv sample data source which can be downloaded from GitHub.
- Select the Column Delimiter as 'Tab'.
- Then click Next to check the Fields section, which includes field names with their corresponding data types present in the CSV file.
- Click Next to proceed to the final screen of the Report Wizard.
- On the final screen of the Report Wizard, review the summary of the report and click Finish to successfully add the report with the CSV data source.
See CSV Provider for more information on building SQL queries.
Design Report Layout
- Drag and drop Table data region onto the design area of the Report Designer.
- In the cells of the details row, drag-drop the [ProductName], [UnitPrice], and [ProductID]fields.
- Add another column to the right of the [ProductID] column.
- Drag-drop the CheckBox control onto the empty textbox in the details row of the added column.
- With CheckBox selected, set the Checked property to the expression:
=ToBoolean(ToInt32(Fields!Discontinued.Value)).
Note that since we used the CSV data, the field [Discontinued]needs to be converted to boolean.
- Preview the report.
See Also
