Trellis Grouping
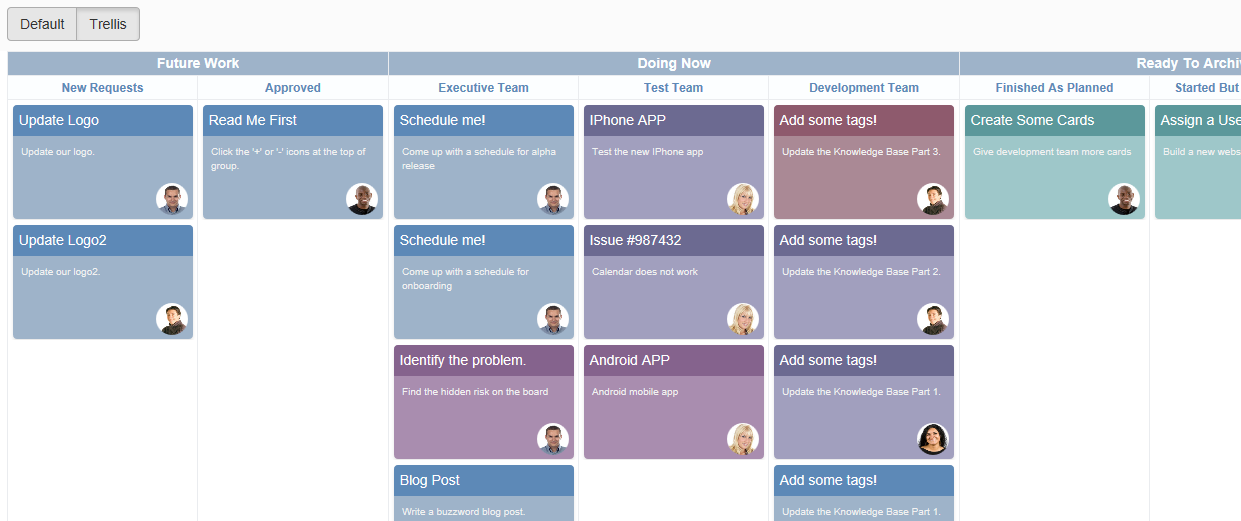
The trellis view is a grouping strategy that displays data laid out in a set of cells within a grid. This view is useful for quick comparisons and to display data in an organized manner. When a card is dragged from one column to another, the group and the underlying data values are modified.
The Trellis Grouping can be used with the following layout engines:
- Trellis View with the Grid Layout
- Trellis View with the Card Layout
Trellis View with the Grid Layout
This view is essentially a grid view that is grouped into vertical lists. The rows are laid out using a horizontal or vertical grouping technique.
Trellis Grouping with the grid layout is implemented as follows:
Sample Code
These steps assume that you have already defined the custom styles and data. See Trellis with Grid Layout for additional information.
- Add the following references after the Dataview reference.
<link rel="stylesheet" type="text/css" href="[Your Stylesheet Path]/gc.dataviews.trellis.min.css" />
<script src="[Your Script Path]/gc.dataviews.trellis.min.js"></script>
<script src="data/timelineBoard.js" type="text/javascript"></script>
- Add a div tag within the body tag to include the DOM element as the container in the page.
<div style="height: 100%; position: relative">
  <div class="button-container">
    <button id="normal" type="button" class="btn btn-default" onclick="changeToNormalLayout()">Default</button>
    <button id="trellis" type="button" class="btn btn-default active" onclick="changeToTrellisLayout()">Trellis</button>
  </div>
  <div style="height:90%;">
    <div id="grid1" style="height:100%;"></div>
  </div>
</div>
- Add the rowTemplate definition followed by the column definition.
var rowTemplate =
  '<div class="group-item-container">' +
  '<div class="group-item-container-inner \{{? it.progress==100}}finish\{{?? it.progress>=80}}eighty-per\{{?? it.progress>=50}}fifty-per\{{?? it.progress>=30}}thirty-per\{{??}}start\{{?}}">' +
  '<div data-column="title" class="group-item-title  \{{? it.progress==100}}finish-head\{{?? it.progress>=80}}eighty-per-head\{{?? it.progress>=50}}fifty-per-head\{{?? it.progress>=30}}thirty-per-head\{{??}}start-head\{{?}}"></div>' +
  '<div data-column="photo" class="group-photo-container"></div>' +
  '<div data-column="description" class="group-item-description"></div>' +
  '</div></div>';

var photoPresenter = '<img class="employee-photo" src="\{{=it.photo}}" />';
var columns = [
  {
    id: 'title',
    name: 'title',
    dataField: 'title',
  },
  {
    id: 'description',
    name: 'description',
    dataField: 'description',
  },
  {
    id: 'photo',
    dataField: 'photo',
    presenter: photoPresenter,
  },
  {
    id: 'progress',
    dataField: 'progress',
  },
];

var TrellisGrouping = new GC.DataViews.TrellisGrouping({
  panelUnitWidth: 190,
});
- Initialize the code by calling the Grid ID from the DIV tag.
var dataView = new GC.DataViews.DataView(
  document.getElementById('grid1'),
  data,
  columns,
  new GC.DataViews.GridLayout({
    grouping: [
      {
        field: 'work',
        header: {
          height: 24,
        },
      },
      {
        field: 'category',
        header: {
          height: 24,
        },
      },
    ],
    rowTemplate: rowTemplate,
    rowHeight: 120,
    groupStrategy: TrellisGrouping,
  })
);
- Add functions to switch between the Default and the Trellis views.
function changeToNormalLayout() {
  $('#normal').addClass('active');
  $('#trellis').removeClass('active');
  dataView.data.groupDescriptors = null;
  var options = dataView.options;
  options.groupStrategy = null;
  options.rowHeight = 40;
  options.rowTemplate = null;
  dataView.invalidate();
}

function changeToTrellisLayout() {
  $('#normal').removeClass('active');
  $('#trellis').addClass('active');
  dataView.data.groupDescriptors = [
    {
      field: 'work',
      header: {
        height: 24,
      },
    },
    {
      field: 'category',
      header: {
        height: 24,
      },
    },
  ];
  var options = dataView.options;
  options.groupStrategy = TrellisGrouping;
  options.rowHeight = 120;
  options.rowTemplate = rowTemplate;
  dataView.invalidate();
}
Trellis with the Card Layout
In this grouping strategy, each row is considered to be a card item of the same height and width. This view is essentially a grouped card layout that allows the user to change groups using drag and drop. In the following example, you can see the cards in a list that is grouped by category.
Trellis Grouping with the card layout is implemented as follows:

Sample Code
These steps assume that you have already defined the custom styles and data. See Trellis with Card Layout for additional information.
- Add the following references after the Dataview reference.
<link rel="stylesheet" type="text/css" href="[Your Stylesheet Path]/bootstrap-snippet.min.css" />
<link rel="stylesheet" type="text/css" href="[Your Stylesheet Path]/gc.dataviews.cardlayout.min.css" />
<link rel="stylesheet" type="text/css" href="[Your Stylesheet Path]/gc.dataviews.trellis.min.css" />
<script src="scripts/gc.dataviews.cardlayout..min.js" type="text/javascript"></script>
<script src="scripts/gc.dataviews.trellis.min.js" type="text/javascript"></script>
<script src="data/flashcard.js" type="text/javascript"></script>
- Add a <div> tag within the <body> tag to include the DOM element as the container in the page.
<div style="height: 100%; position: relative">
  <div class="button-container">
    <button id="normal" type="button" class="btn btn-default" onclick="changeToNormalLayout()">Default</button>
    <button id="trellis" type="button" class="btn btn-default active" onclick="changeToTrellisLayout()">Trellis</button>
  </div>
  <div style="height:85%;">
    <div id="grid1" style="height:100%;"></div>
  </div>
</div>
- Add the rowTemplate definition followed by a column definition.
var rowTemplate =
  '<div class="group-item-container">' +
  '<div class="image-container" data-column="image"></div>' +
  '<div class="name-container" data-column="name"></div>' +
  '\{{?it.currentCategory===it.category}}<div class="correct-container"><div class="correct-mark"></div></div>\{{?}}' +
  '</div>';

var imagePresenter = '<img class="flash-image" src="\{{=it.image}}" />';
var columns = [
  {
    id: 'image',
    dataField: 'image',
    presenter: imagePresenter,
  },
  {
    id: 'name',
    dataField: 'name',
  },
];

var groups = ['animal', 'weather', 'emotion', 'shape'];

data.forEach(function (item) {
  item.currentCategory = getRandCategory(item.category, groups);
});
var TrellisGrouping = new GC.DataViews.TrellisGrouping({
  panelUnitWidth: 300,
  gapSize: 6,
});
- Initialize the code by calling the Grid ID from the DIV tag.
var dataView = new GC.DataViews.DataView(
  document.getElementById('grid1'),
  data,
  columns,
  new GC.DataViews.CardLayout({
    cardHeight: 160,
    cardWidth: 150,
    grouping: [
      {
        field: 'currentCategory',
        preDefinedGroups: groups,
        header: {
          height: 40,
        },
      },
    ],
    groupStrategy: TrellisGrouping,
    rowTemplate: rowTemplate,
  })
);
- Add functions to switch between the Default and the Trellis views.
function getRandCategory(correctCategory, groups) {
  return groups[Math.floor(Math.random() * 8)] || correctCategory;
}

function changeToNormalLayout() {
  $('#normal').addClass('active');
  $('#trellis').removeClass('active');
  var options = dataView.options;
  options.groupStrategy = null;
  dataView.invalidate();
}

function changeToTrellisLayout() {
  $('#normal').removeClass('active');
  $('#trellis').addClass('active');
  var options = dataView.options;
  options.groupStrategy = TrellisGrouping;
  dataView.invalidate();
}
Feedback
Submit and view feedback for