Version 1
Version 1
Adding a Sparkline Column
In DataViewsJS, you can use sparklines to display data trends in a small graph. The sparklines display the most recent value at the right-most data point and compare the value to the previous values.
The following table lists the formulas for different sparklines:
| Sparkline | Formula | Description |
|---|---|---|
| PIESPARKLINE | =PIESPARKLINE(column\percentage,color1?,color2?,…..) | For column\percentage: If column, column value should be a number or a number array. If percent, the percentage is the value. If parse value is invalid, it will be treated as 0. ColorInfo: - Color parameter count is more than or equal to range count, values and colors are one-to-one correspondence. - Color parametr count is less than the range count, it recycles given colors and uses a linear gradient to ensure each sector has a different color. - If there is no color, it uses "darkgray" as default. |
| LINESPARKLINE | =LINESPARKLINE(data, dateAxisData?, setting?) | where: data - a column reference represents sparkline data dateAxisData - a column reference represents sparkline date axis data. setting - a string with JSON formatNote: dateAxisData and setting is optional and each value of "setting" property has a default value. |
| COLUMNSPARKLINE | =COLUMNSPARKLINE(data, dateAxisData?, setting?) | where: data - a column reference represents sparkline data dateAxisData - a column reference represents sparkline date axis data. setting - a string with JSON formatNote: dateAxisData and setting is optional and each value of "setting" property has a default value. |
| WINLOSSSPARKLINE | =WINLOSSSPARKLINE(data, dateAxisData?, setting?) | where: data - a column reference represents sparkline data dateAxisData - a column reference represents sparkline date axis data. setting - a string with JSON formatNote: dateAxisData and setting is optional and each value of "setting" property has a default value. |
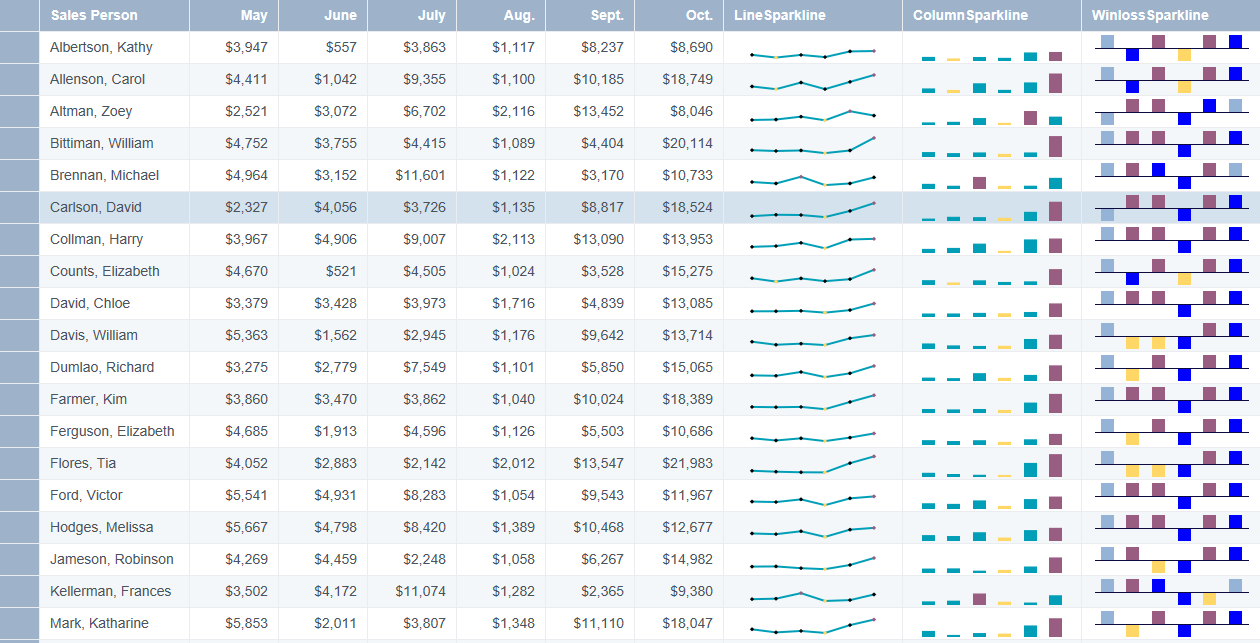
Use the following steps to add different types of sparklines, such as PIESPARKLINE, LINESPARKLINE, COLUMNSPARKLINE and WINLOSSSPARKLINE. The image displays various sales trends:
Sample Code
- Add references to DataViewsJS files.
<script src="[Your Script Path]/gc.dataviews.common.min.js" type="text/javascript"></script>
<script src="[Your Script Path]/gc.dataviews.core.min.js" type="text/javascript"></script>
<script src="[Your Script Path]/gc.dataviews.grid.min.js" type="text/javascript"></script>
- Define the different sparkline variables to render while creating a grid.
function renderWinlosssparkline(data, container) {
  var newData = [];
  newData.push(data.may - standard);
  newData.push(data.june - standard);
  newData.push(data.july - standard);
  newData.push(data.aug - standard);
  newData.push(data.sept - standard);
  newData.push(data.oct - standard);
  var winlossSparkline = new GC.DataViews.WinlossSparkline({
    values: newData,
    setting: {
      axisColor: '#0C0A3E',
      markersColor: '#FED766',
      negativeColor: '#FED766',
      seriesColor: '#995D81',
      displayXAxis: true,
      showFirst: true,
      showHigh: true,
      showLast: true,
      showLow: true,
      showNegative: true,
      showMarkers: true,
    },
  });
  winlossSparkline.paint(container);
}

var lineSparklineSetting = {
  highMarkerColor: '#995D81',
  lowMarkerColor: '#FED766',
  markersColor: 'black',
  seriesColor: '#009FB7',
  showMarkers: true,
  showHigh: true,
  showLow: true,
  lineWeight: 2,
  minAxisType: 2,
  maxAxisType: 2,
  manualMax: 25000,
  manualMin: 0,
};
var columnSparklineSettings = {
  highMarkerColor: '#995D81',
  lowMarkerColor: '#FED766',
  markersColor: 'black',
  seriesColor: '#009FB7',
  showMarkers: true,
  showHigh: true,
  showLow: true,
  minAxisType: 2,
  maxAxisType: 2,
  manualMax: 25000,
  manualMin: 0,
};
var lineSparklineFormula =
  '=LINESPARKLINE("may,june,july,aug,sept,oct", "", "' + JSON.stringify(lineSparklineSetting).replace(/"/g, '') + '")';
var columnSparklineFormula =
  '=COLUMNSPARKLINE("may,june,july,aug,sept,oct", "", "' +
  JSON.stringify(columnSparklineSettings).replace(/"/g, '') +
  '")';
var smallDevice = screen.width <= 480;
var colWidthSmall = smallDevice ? 125 : '*';
var colWidthLarge = smallDevice ? 125 : '2*';
- Add the column definition.
var columns = [
  {
    id: 'salesPerson',
    caption: 'Sales Person',
    dataField: 'Salesperson',
    width: colWidthSmall,
  },
  {
    id: 'may',
    caption: 'May',
    dataField: 'May',
    dataType: 'number',
    format: '$#,##',
  },
  {
    id: 'june',
    caption: 'June',
    dataField: 'June',
    dataType: 'number',
    format: '$#,##',
  },
  {
    id: 'july',
    caption: 'July',
    dataField: 'July',
    dataType: 'number',
    format: '$#,##',
  },
  {
    id: 'aug',
    caption: 'Aug.',
    dataField: 'Aug',
    dataType: 'number',
    format: '$#,##',
  },
  {
    id: 'sept',
    caption: 'Sept.',
    dataField: 'Sept',
    dataType: 'number',
    format: '$#,##',
  },
  {
    id: 'oct',
    caption: 'Oct.',
    dataField: 'Oct',
    dataType: 'number',
    format: '$#,##',
  },
  {
    id: 'trend',
    caption: 'LineSparkline',
    width: colWidthLarge,
    dataField: lineSparklineFormula,
  },
  {
    id: 'sales',
    caption: 'ColumnSparkline',
    width: colWidthLarge,
    dataField: columnSparklineFormula,
    visible: !smallDevice,
  },
  {
    id: 'winloss',
    caption: 'WinlossSparkline',
    width: colWidthLarge,
    asyncRender: renderWinlosssparkline,
    visible: !smallDevice,
  },
];
- Initialize the code by calling the grid ID from the DIV tag.
dataView = new GC.DataViews.DataView(
  document.getElementById('grid1'),
  data,
  columns,
  new GC.DataViews.GridLayout({
    rowHeight: 32,
  })
);
See also
Feedback
Submit and view feedback for