Getting Started with MAP for ASP.NET Wijmo
In 2014 V3 release this year, we added new map control to Studio ASP.NET Wijmo, if you are developing an application that uses geographical data then the ComponentOne Map is a great way to visualize that data. The maps controls has built-in support for Bing Maps and also supports custom sources. Let's see how we can get started with the Map control for ASP.NET Wijmo.
Basic Map settings:
Here we will learn about the basic settings for the Map control.
- Create a new project in Visual Studio and drop the map control in the designer. You will notice that the source property is set to "BingMapsAerialSource", by default three Bing map sources(Aerial/Road/Hybrid) are supported.
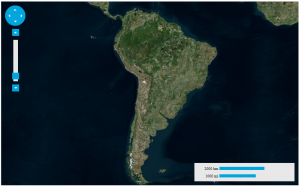
- Lets customize this to zoom over a specific continent. Set the "Center" property to (-65,-25) and the zoom factor to 3.
- Set the height to "475" and width to "756"
- Upon running the application you should see that "South America" now has the center.
- You can also specify custom sources. See this sample for one such implementation.

Layers:
The map control supports various layers in order to customize and draw different shapes\ items on the Map.
C1VectorLayer:
The Vector layer allows you to place various objects with geographic coordinates on the map. For example, you can create polygons\poly-lines and labels. Let's see how to create a virtual layer from json data.
- In Visual Studio you can create a layer using the layer's collection available in the property window or in code. When you open the layers collection, you may find the option to add various layers, by selecting C1VectorLayer.
- C1Maps supports two types of vector data in json format, one is it's own wijjson and the other is open source GeoJson format. For data, in this example, I have a file that has wijjson data in it, the name of the file is worldmap.json.
- Set the DataUrl property of the layer to the file name, below is the markup.
<div>
        <cc1:C1Maps ID="C1Maps1" Center="-65,-25" Zoom="3" source="BingMapsAerialSource" Width="760" Height="470" runat="server">
            <Layers>
                <cc1:C1VectorLayer DataUrl="worldmap.json">
                </cc1:C1VectorLayer>
            </Layers>
        </cc1:C1Maps>
     </div>
On running the application we see the vector layer applied.  See an example here. A simple example is to add a polygon to the Map. Here is C# code that creates the vector layer, adds a polygon to the vector layer and then adds points to it.
// Create a layer and add it to the map
C1VectorLayer vl = new C1VectorLayer();
C1Maps1.Layers.Add(vl);

// Set the datasource Type
vl.DataType = DataType.WijJson;

//Create a vector polygon and add it to the layer
C1VectorPolygon vpl = new C1VectorPolygon();
vl.DataWijJson.Vectors.Add(vpl);

// Add points to the vector polygon
vpl.Points.Add(new PointD(-80.15, 42.12));
vpl.Points.Add(new PointD(-123.08, 39.09));
vpl.Points.Add(new PointD(-3.90, 30.85));

// set the fill, stroke color and stroke width
vpl.Fill = System.Drawing.Color.Snow;
vpl.Stroke = System.Drawing.Color.Yellow;
vpl.StrokeWidth = 2;

C1ItemsLayer
Items layer is the easiest way to display items over a map. It can be added to the maps in the similar manner, as a vector layer using the C1Layer Collection Editor. A detailed example can be viewed here.
C1VirtualLayer
The virtual layer displays elements over the map supporting virtualization and asynchronous data loading. It can be used to display an unlimited number of elements, as long as not many of them are visible at the same time. To get acquainted with the ASP.NET Map control and to see some interesting implementations you can view the demos here . The Map is also available as a widget and can be used in a MVC application, check out the samples . Get your copy of Studio for ASP.NET Wijmo here.

MESCIUS inc.