SpreadJS allows generating dynamic shapes based on data, extending the built-in shapes' capability. You can create custom shapes using data and formulas to drive dynamic shapes and shape values. Dynamically generated shapes have multiple use cases. For example, you could create dynamic manufacturing production/plant lines showing the status of each machine, build an office floor plan showing available rooms, show the status of each server in your server room, and much more.
In this blog, we'll introduce you to how you can accomplish these by selecting from the available seats in an airplane seating chart in a flight seat booking application. Each shapes' color is driven by a value that defines the seats status using formulas.
Introduction to Data-Driven Shapes
Currently, SpreadJS has vast number of built-in shapes, and you can also create custom shapes too as per the requirement. Currently we have more than 60 shapes included with SpreadJS. You can create spreadsheets with data driven shapes and display flow diagrams, dialogs, annotations, flow charts, hierarchical data, and much more. The image below shows all of the built-in shapes within SpreadJS:
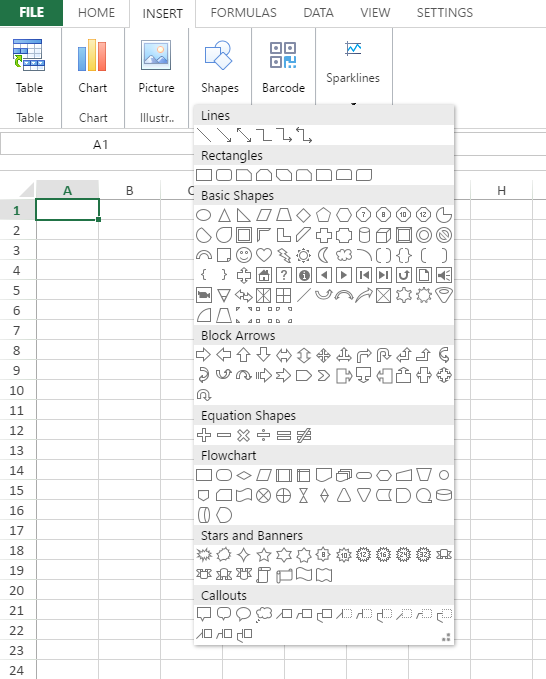
Along with these built-in shapes you can also create custom shapes. You can create these custom shapes specific to your needs. You can generate the shapes dynamically based on the data in the cells. So now let's start creating the interactive seats booking app with the help of dynamically generated shapes.
To begin with, the app uses an image of an aircraft with a seat layout:
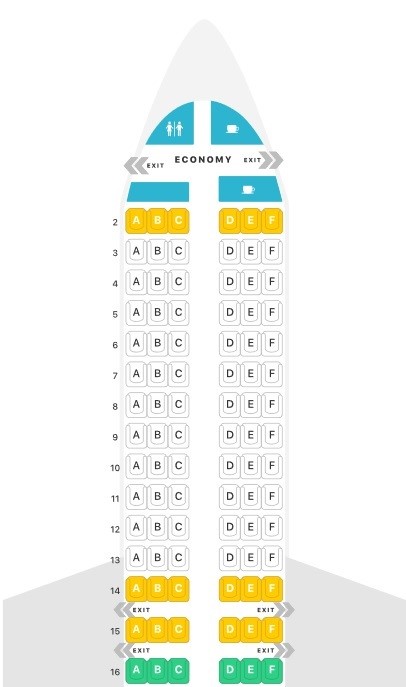
Step 1. For the seat layout, we created the custom shapes and laid them over the aircraft seats. To create the custom shapes, we used the SVG path and converted that to shape form.
var cmdMap = {
            moveTo: 'M',
            lineTo: 'L',
            bezierCurveTo: 'B',
            quadraticCurveTo: 'Q',
            arc: 'A',
            arcTo: 'AT',
            closePath: 'Z'
        };
        var spread;
        var sheet;
        var sheetData;
        var selectedSeatsArray = [];
        // convert svg points to shape path
        function pointsToPath(points) {
            var ps = points.split(' ');
            var mx = 10000; // shift the shape to (0, 0)
            var my = 10000;
            ps = ps.map(function (p) {
                var t = p.split(',');
                if (parseFloat(t[0]) < mx) {
                    mx = parseFloat(t[0]);
                }
                if (parseFloat(t[1]) < my) {
                    my = parseFloat(t[1]);
                }
                return { x: parseFloat(t[0]), y: parseFloat(t[1]) };
            });

            var cmds = [];
            cmds.push(['M', ps[0].x - mx, ps[0].y - my]);

            for (var i = 1; i < ps.length; i++) {
                cmds.push(['L', ps[i].x - mx, ps[i].y - my]);
            }

            cmds.push(['Z']);

            return [cmds];
        }
Step 2. Convert the SVG path to shape path in code.
        function convertPath(d) {
            var cmds = parser.parse(d);
            var mx = 10000; // shift the shape to (0, 0)
            var my = 10000;

            var pathCommands = cmds.map(function (cmd) {
                for (var i = 0; i < cmd.args.length; i = i + 2) {
                    if (cmd.args[i] < mx) {
                        mx = cmd.args[i];
                    }
                    if (cmd.args[i + 1] < my) {
                        my = cmd.args[i + 1];
                    }
                }
                return [cmdMap[cmd.type]].concat(cmd.args);
            });

            var ret = [];
            var t = [];
            for (var i = 0; i < pathCommands.length; i++) {
                var cmd = pathCommands[i];
                for (var j = 1; j < cmd.length; j = j + 2) {
                    cmd[j] = cmd[j] - mx;
                    cmd[j + 1] = cmd[j + 1] - my;
                }
                t.push(cmd);
                if (cmd[0] == 'Z') {
                    ret.push(t);
                    t = [];
                }
            }
            return ret;
        }
Step 3. To add the custom shapes to the desired relevant positions, we call the 'add' method of Spread.Sheets shapes' collection.
var s1shape = createShape(s1commands, shapeleft, shapetop, shapewidth, shapeheight, seatNum);
var ret2 = sheet.shapes.add(seatNum, s1shape);
Step 4. The createShape method in the above code creates the shape as per the location, size, and style given. This function has following body:
function createShape(serverpathCommands, sleft, stop, swidth, sheight, shapename) {
            var ret = 0;
            var shapecolorret = -1
            var servermodel = {
                name: shapename,
                left: sleft,
                top: stop,
                width: swidth,
                height: sheight,
                angle: 0,
                options: {
                    fill: {
                        type: GC.Spread.Sheets.Shapes.ShapeFillType.solid,
                        color: shapeFormula
                    },
                    stroke: {
                        type: GC.Spread.Sheets.Shapes.ShapeFillType.solid,
                        color: shapeFormula
                    },
                    textFormatOptions: {
                        allowTextToOverflowShape: false,
                        wrapTextInShape: false,
                        font: '="11px Arial"',
                        fill: {
                            type: GC.Spread.Sheets.Shapes.ShapeFillType.solid,
                            color: 'black'
                        }
                    }
                },
                path: serverpathCommands
            };
            return servermodel;
        }
Step 5. With the exception of the seat view, the app has the functionality of selecting a seat. At first the seats are loaded with random generated numbers between 0 and 2. The numbers are then automatically calculated to return a color based on their value using the formula below.
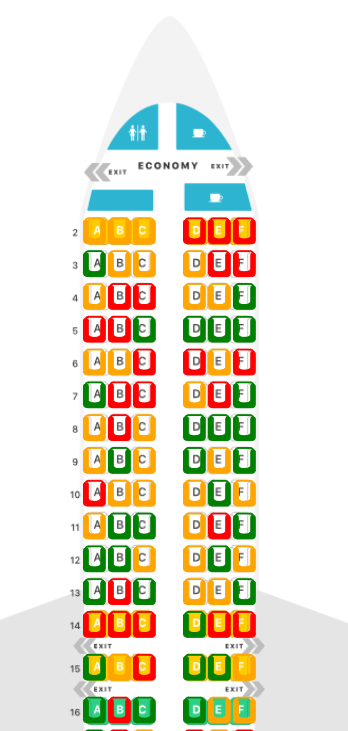
The green color, value 0, means that the seat is available. The red color, value 1, means that the seat is already booked or reserved. The orange color, value 2, means that the seat is a premium seat. These colors are generated with a formula using data from another sheet.
The formula used to color the shapes is as follows:
var shapeFormula = "=CHOOSE(VLOOKUP(name,Sheet2!A1:B186,2,False)+1, \"green\", \"red\", \"orange\")";
The view of the page generated with shapes within Spread.Sheets looks like:
We have also handled the user interaction with the seats in this app in the following manner:
- When clicking a green color seat (available): It changes the seat color to red and shows the selected seat number next the airplane shape.
- On clicking a red color seat (reserved): A dialog pops up displaying the message that the seat is already reserved.
- On clicking an orange color seat (premium): A confirmation dialog is shown saying that this is a Premium seat. Are you sure you want to upgrade? If the user clicks yes, the premium seat is selected and it changes the seat color to red and shows the selected seat number next to the airplane shape.
The most important part to note about the above, and the main purpose of this blog, is that the seat color changes are all automatically done simply by updating the seat value on Sheet 2. The formula we defined will then take care of these changes for us automatically. This shows the power and flexibility of using formulas and data to drive shape properties.
The final output of the flight seat selection app looks as shown in the image below:
You can download the sample application below to better understand the functionality.
This is a brief introduction to how you can create shapes and formulas and dynamically adjust their values based on data that could come from a variety of locations. We hope you will take these concepts and apply them to your own custom data driven applications.
Download the sample here.

Deepak Sharma