How to Create Custom Reports using Excel (.xlsx) Templates in Java
Have you ever wondered utilizing your previous report wishing if you could just replace its data to create a new report? If you often use the same layout in a workbook, the use of templates is essential to save time.
A template is a pre-defined formatted document having static data along placeholders for the data coming dynamically from data source at run time. It helps avoiding the cumbersome repetitive tasks and helps focus on more critical aspects of the report.
Introducing GcExcel Templates
The latest release of GrapeCity Documents for Excel (GcExcel) introduces support for Excel Template. GcExcel templates allow users create reports quickly yet easily by automating its data generation process. It needs an Excel template and a data source. The feature comes with comprehensive syntax and API to bind Excel documents to data and create Excel reports with advance layouts. With flexible template syntax, easy notations, support for various types of data sources and minimal need for programming, GcExcel Templates is the easiest tool in the market to create custom reports dynamically.
Let's consider a scenario where a company takes regular snapshots of their product sales to analyze the trends and see, how easy it is to use GcExcel templates to create such reports.
Business Scenario: Generating Quarterly Products Sales Report using Templates
A sales report is a set of records for the sales activity for a particular time span. It helps the managers plan effective sales strategies and also monitor the performance of their sales team. Quarterly sales report provides a bigger picture of the sales activity and helps analyse trends which can in turn be used to decide on sales forecasting process.
Consider, an organization selling many products wanting to analyse how their sales trend have changed over the years. For this, they wish to create a sales report. However, since there can be many products and the sales report can be required for different time intervals in future, they wish to automate the report generation process in a way that the sales information is fetched automatically from the database and sales report gets generated as an Excel sheet.
Let’s try to understand how easy it is to implement above requirement using GcExcel Templates. To perform this task, developer needs to first design a template in MS Excel holding all static data with placeholders for sales data, this needs to be done only once. Once, the template is ready apply simple code to bind this template with your sales database and GxExcel will do the rest by cleverly creating sales report excel sheets, one for each financial year.
The following image shows how a sales report for a specific quarter looks like this:

To begin sales report generation, the first step is to create a template in MS Excel. Since the template creation is only a one- time task and the appearance of the sales report largely depends on how well it is designed, it’s important to be familiarized with template creation using GcExcel template syntax.
Generating XLSX Template in JAVA Apps
In dynamic report generation the ability to create template is the most critical part. While creating template, you’ll need to follow certain GcExcel template syntax used to define database fields. Therefore, in the template for sales report wherever you want to replace the product and sales information, you must define the database fields following the syntax.
Template creation shall broadly be divided into following steps:
- Define data
- Define data fields
- Set data field template properties
- Use formula functions
1. Define Data - JAVA
Data fields like Area, City and items' Category, Name and Sale are present in the final report image shown above, therefore need to be added in the template. Hence, the following classes: Region, Item and Sale are created which will act as blueprint for sales report generation:
Data Field Declaration - JAVA
public static class Item
{
 @JsonProperty("ProductID")
 private int ProductID;
 public int getProductID()
 { return this.ProductID; }
 public void setProductID(int productID)
 { this.ProductID = productID; }

 @JsonProperty("Name")
 private String Name;
 public String getName()
 { return this.Name; }
 public void setName(String name)
 { this.Name = name; }

 @JsonProperty("Category")
 private String Category;
 public String getCategory()
 { return this.Category; }
 public void setCategory(String category)
 { this.Category = category; }

 @JsonProperty("Revenue")
 private double Revenue;
 public double getRevenue()
 { return this.Revenue; }
 public void setRevenue(double revenue)
 { this.Revenue = revenue; }
}

public static class Region
{
 @JsonProperty("Area")
 private String Area;
 public String getArea()
 { return this.Area; }
 public void setArea(String area)
 { this.Area = area; }

 @JsonProperty("City")
 private String City;
 public String getCity()
 { return this.City; }
 public void setCity(String city)
 { this.City = city; }
}

public static class Sale
{
 @JsonProperty("Duration")
 private String Duration;
 public String getDuration()
 { return this.Duration; }
 public void setDuration(String duration)
 { this.Duration = duration; }

 @JsonProperty("Region")
 public Region Region;
 public Main.Region getRegion()
 { return this.Region; }
 public void setRegion(Main.Region region)
 { this.Region = region; }

 @JsonProperty("Item")
 public Item Item;
 public Main.Item getItem()
 { return this.Item; }
 public void setItem(Main.Item item)
 { this.Item = item; }

 public Sale()
 {
    this.Item = new Item();
    this.Region = new Region();
 }
}

public class RootObject
{
 @JsonProperty("Sales")
 private List<Sale> Sales;
 public List<Sale> getSales()
 { return this.Sales; }
 public void setSales(List<Sale> sales)
 { this.Sales = sales; }
}
Here @JsonProperty defines the logical property used in Serialization and DeSerialization of JSON.
public @interface JsonProperty
{ String value(); }
2. Creating Templates in MS-Excel
2.1 Defining Data Fields
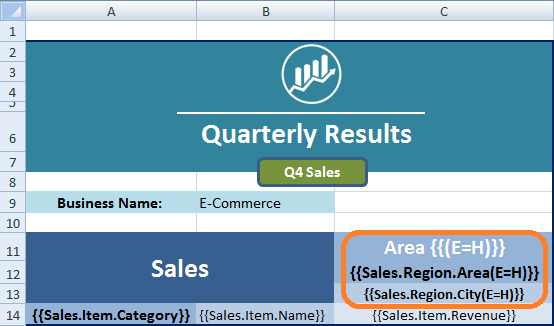
GcExcel Template syntax uses double curly braces ''{{ }}' to define database fields. So, in the template cells which you want to act like placeholders for the dynamic data fields values like Area name, City name, etc., define the database field within double curly braces. For instance, let’s see how to show item’s area name like shown in the final report image above.
According to the blueprint, area’s name is mapped to Area property of Region class and Sale class contains Region as its member, so you should define the cell C12 as nested field {{Sales.Region.Area}}, where Sales is the name of the data source. Similarly, revenue and city’s name cells, C14 and C13 can be defined as {{Sales.Item.Revenue}} and {{Sales.Region.City}}, respectively.
The same understanding shall be applied for showing Category and Item’s name. These fields are mapped to Item class's Category and Name properties and the Sale class defines Item class as its member, so cells A14 and B14 can be defined as {{Sales.Item.Category}} and {{Sales.Item.Name}} respectively.

2.2 Set Data Fields Properties
To let you control how the data fields get replaced, GcExcel exposes various properties like Range, Expansion, Context and more. These properties are organized inside brackets '( )'. For the convenience of the developers, multiple properties can simultaneously be defined in a cell separated by commas ',' and are designed to be case insensitive. Additionally, property and their values also support short hand notation.
These properties come in very handy while creating any report. In the creation of Sales report as well, these properties are very important. So, let see how they work.
Expansion
In reports, data can expand in any direction, horizontal or vertical. To define the direction for expansion of data GcExcel template syntax provides Expansion 'E' property.
In previous step, in placeholders data fields were defined such that they are replaced by the fields values from database. But if there are multiple values within the same data field, without expansion they will get overridden by each other. To prevent this, you should use the Expansion property.
The final sales report image presented at the top, shows Category and Items name expanding vertically whereas Areas and Cities name are seen to be expanding horizontally. To generate such an output, you should define E=V and E=H in the cells, respectively.
Accordingly, the definition for cells C12 and C13 shall become {{Sales.Region.Area (E=H)}} and {{Sales.Region.City (E=H)}} respectively. Similarly, the cells A14 and B14 shall have definition: {{Sales.Item.Category (E=V)}} and {{Sales.Item.Name (E=V)}} respectively.
The default value of Expansion property is Vertical 'V', so setting the Expansion property to Vertical in the cells needed to expand vertical can be skipped.
Context
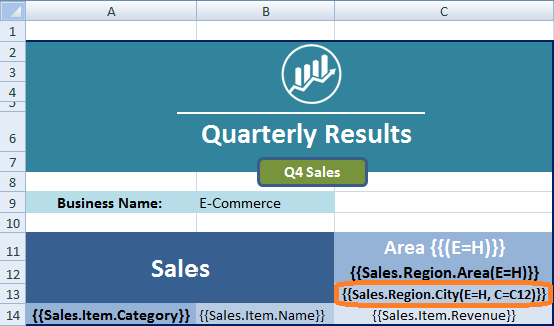
In complex use-cases, its natural for data to have relationships among them. In such scenarios, a data field can either group the dependent field cells or can filter them. Here, the cell that defines the relation is called the context cell of the dependent cell.
The context cell for vertical expansion (E=V) is the adjacent cell on the left and for horizontal expansion (E=H) adjacent cell on the top is the context cell, by default.
In the final sales report, the city cells are filtered by the area cell in a way such that only the cities belonging to the specific area appear below it. To implement such a relationship, the area cell should become the context cell for the city cell. So, the city cell shall be defined as {{Sales.Region.City(E=H, C=C12)}}.
2.3 Using Formula Functions
Formula in the simplest form is an expression made up of cell addresses, arithmetic operators and a function is a predefined formula. Functions allow one to use descriptive names to automatically apply formulas and helps increase productivity.
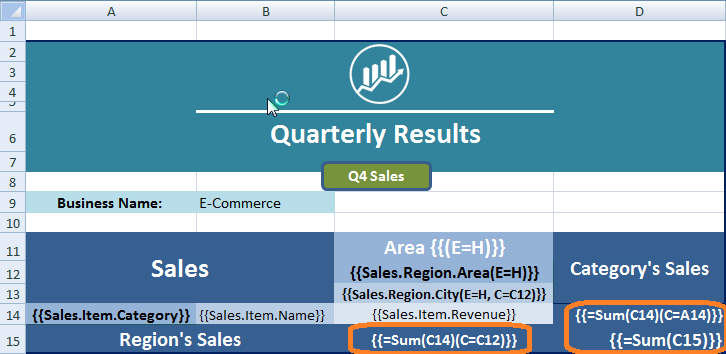
Any report is expected to have numeric data and since formulas, functions are building blocks of working with numeric data, GcExcel templates too support the most common Excel functions like Sum, Count, Average, Min, Max, and more.
In the sales report as well, to analyze the revenue generated by each category it needs summing up the Revenue field values. For this Sum function can be used and since the calculation happens w.r.t each category, category cell A14 will act as Context cell for cell D14 like {{=Sum(C14)(C=A14)}}. Similarly, to calculate sales for each area including all its cities, again use the Sum function on Revenue cell but with Category cell C12 as its Context, like {{=Sum(C14)(C=C12)}}.
To generate separate sheets, GcExcel supports creating multiple sheets. This is done by renaming the sheet following GcExcel template syntax.
Like, in sales report to create multiple excel sheets for each financial year, just rename in Excel to {{Sales.Duration}}, where Duration is a property in Sale class.
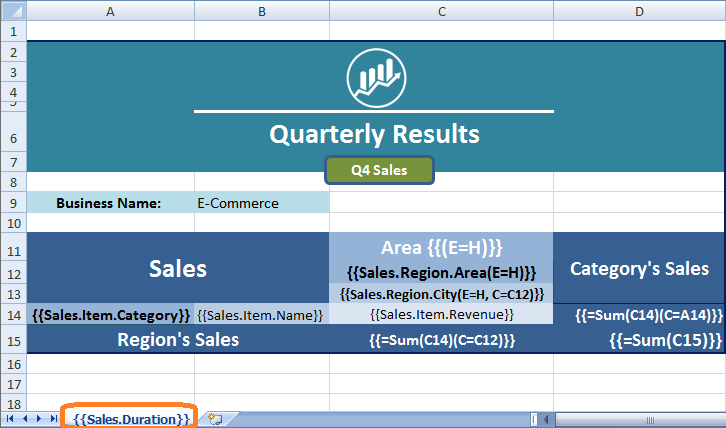
The above image also shows how the final Excel template using GcExcel template syntax should look.
Once you are aware of the syntax and have created excel template for the sales report, just load this template in GcExcel, add data, process template, and that’s it, your report will be ready.
Steps to use GcExcel Templates
Step 1. Installation
Prerequisites
- Install Java 6 SDK or higher versions for Windows/Linux/Mac.
- Install Java IDE of your choice. This article will focus on using GcExcel with IntelliJ.
Installing GcExcel Package on IntelliJ
- Download GcExcel package - gcexcel-3.0.0.jar and gcexcel-extension-3.0.0.jar from website.
- Open IntelliJ IDE.
- Create a new Java project.
- Add new directory 'libs' under the project.
- Copy gcexcel-3.0.0.jar, gcexcel-extension-3.0.0.jar and gson-2.8.5.jar to 'libs' folder using file explorer.
*gson-2.8.5.jar is google gson jar file used to deserialize json string. You can download it from here.
- Right-click 'libs' folder and choose 'Add as library' option.
- Press OK.
For Gradle project:
Open the build.gradle and append the below script in the dependencies block compile("com.grapecity.documents:gcexcel:3.0.0.jar")
For Maven project:
Open the pom.xml and add below xml element in the dependencies node.
<dependency>
   <groupId>com.grapecity.documents</groupId>
   <artifactId>gcexcel</artifactId>
   <version>3.0.0-snapshot</version>
</dependency>
The jar file will be added as a library in the project and your project can now reference all classes of GcExcel in the jar file.
Step 2. Set-up Your Project
Add Namespace
In Main.java, import following namespaces:
import com.grapecity.documents.excel.Workbook;
import com.google.gson.Gson;
import java.io.InputStream;
import java.io.InputStreamReader;
import java.util.List;
Create a New Workbook
In the main function, add the following code to create a new GcExcel workbook:
Workbook workbook = new Workbook();
Load Excel Template
Use Open method to load existing Excel Template file (shown in Fig.1) in the GcExcel workbook:
workbook.open("Sales_Template.xlsx");
Initialize Data
GcExcel templates support various types as data source like Custom Object, Json file, ResultSet, Variable, DataSet/DataTable and more. Here, we will be focusing on using Json file as GcExcel DataSource:
InputStreamReader reader = new InputStreamReader(GetResourceStream("SalesData.json"));
Place the SalesData.json file in the 'src' folder, same as where the Main.java file is present.
Add Datasource
Use the AddDataSource method, to load the data in workbook:
Gson gson = new Gson();
RootObject datasource = gson.fromJson(reader, RootObject.class);
workbook.addDataSource("Sales", datasource.getSales();
Process Template
Use ProcessTemplate to execute the template. Invoking this method, the data fields will bind automatically to the Excel template loaded in the workbook:
workbook.processTemplate();
Save Report to XLSX
Once processed, GcExcel is ready to be exported to an Excel file. Use the Save method to generate the sales report in XLSX format:
workbook.save("SalesReport.xlsx");
Download the Application
Help .NET | Help Java | Demo .NET | Demo Java
If you have a question about this tutorial, leave it for us in the comment thread below!

Ruchir Agarwal