(Re-)Introducing DataEngine for .NET Core
The ComponentOne DataEngine for .NET Core (C1DataEngine) is a standalone library that delivers high-performance analytics for large datasets. Its column-oriented storage model uses memory-mapped files to provide exceptional performance, often processing millions of records in a second or less.
C1DataEngine lets you import data directly from SQL Server or from an enumerable collection of strongly-typed objects. Once the data has been imported into one or more base tables, you can programmatically create queries to group, join, filter, and aggregate the underlying data. After executing a query, you can access its result set as an in-memory list or persistent memory-mapped file, then call one of the provided APIs to export the results to a file, or to create a strongly-typed collection for use with a data visualization control.
The underlying technology for C1DataEngine was first released in late 2017 as an essential component of FlexPivot for WinForms. Although the .NET Core version (available with ComponentOne Ultimate) is new for 2019 v2, it is a direct port of proven, well-tested code.
The current version of DataEngine for .NET Core targets netcoreapp2.2, making it usable in console apps and ASP.NET Core web sites. When .NET Core 3.0 is out of preview, we will release a version that targets netstandard2.1, making it usable in WinForms and WPF apps as well.
This article describes some of the most common use cases for C1DataEngine and provides a high-level overview of its capabilities. It also includes sample code that illustrates typical usage scenarios.
C1DataEngine Common Use Cases
Here are just a few reasons why you might find C1DataEngine to be a useful addition to your toolset:
Large Amounts of Unstructured Data
For developers who need to analyze large amounts of unstructured data, C1DataEngine can readily import any dataset that can be converted programmatically into an IEnumerable. From there, developers can take advantage of its high-performance, column-oriented architecture to construct analytical queries.
Multiple, Disparate Data Sources
For developers who need to integrate data from multiple sources, such as SQL Server, CSV, or JSON, C1DataEngine provides mechanisms for gathering data from remote servers or local files, then tying the data sources together using join queries.
Self-contained Analytics
For developers who need to provide analytics locally within their own application, or who don't want to rely on (or pay for) external tools such as PowerBI, C1DataEngine provides a small footprint library that can be used in any .NET Core application.
Getting Started with C1DataEngine
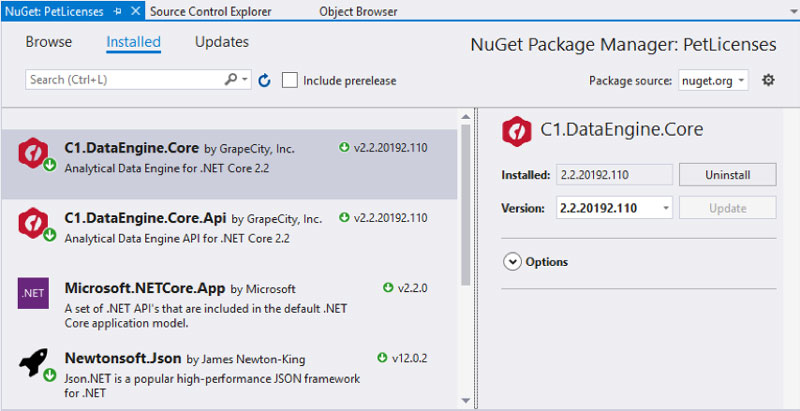
The easiest way to add C1DataEngine to your project is through the NuGet Package Manager in Visual Studio. Make sure that you get the package named C1.DataEngine.Core and not the one named C1.DataEngine, as the latter depends on the full .NET Framework 4.0 and cannot be used for .NET Core development.
You can also download and install C1DataEngine through the service components tile in the ComponentOne Control Panel.
Downloading from this installer also gives you access to samples and other components.
If you prefer to develop using Visual Studio Code, you can add NuGet package references directly to your .csproj file:
<ItemGroup>
  <PackageReference Include="C1.DataEngine.Core" Version="2.2.20192.114" />
  <PackageReference Include="C1.DataEngine.Core.Api" Version="2.2.20192.114" />
</ItemGroup>
Regardless of which development environment you use, you will typically add a reference to both of these packages:
- C1.DataEngine.Core: This is the fundamental library that provides the ability to create and open workspaces, import data, execute queries, and extract data.
- C1.DataEngine.Core.Api: This is an optional library that provides helper classes for instantiating strongly-typed objects, sorting and outputting result sets, and building ad-hoc queries at run time.
There is a third package, C1.DataEngine.Tool, which is never referenced in .csproj files. It implements a .NET Core global tool that provides a command line interface to data import, query execution, and data extraction functionality. See the section at the end of this article for details.
Basic Concepts
Before diving in to specific examples, here are some of the key terms used throughout the C1DataEngine documentation.
Workspace
A workspace is a folder that stores all metadata, base tables, and query results. In code, this folder is represented by an instance of the Workspace class. The Init method is used to initialize a new workspace folder or open an existing one.
Base Tables
Base tables contain data imported from external sources such as SQL Server databases or CSV files. They use an efficient column-oriented storage format that facilitates operations on very large datasets.
Connectors
C1DataEngine provides two built-in connectors for filling base tables with data. DbConnector imports data from a database, while ObjectConnector imports data from an arbitrary IEnumerable collection. Although there is no direct connector for file types such as CSV or JSON, you can use any third-party package that can convert a file into a collection of strongly-typed objects, then use that collection with ObjectConnector.
Queries
A query transforms data from one or more base tables into a result set, which is persisted in the workspace folder using the same file format as base tables. Typical query operations include aggregation, filters, calculated fields, and joins.
Programming with C1DataEngine
Let's consider a simple .NET Core console application that downloads data from the web, imports it into a workspace, executes some queries, and displays the results. Whether you create the project in Visual Studio or from the command line using dotnet new console, the code is the same.
In addition to the two C1DataEngine packages noted earlier, this example also requires a reference to Newtonsoft.Json (version 12.0.2).
Your Program.cs file should reference the following namespaces:
using System;
using System.Net;
using System.Collections.Generic;
using Newtonsoft.Json;
using Newtonsoft.Json.Linq;
using C1.DataEngine;
Opening a Workspace
The first thing your application will do is open a workspace within a specific folder. Although any folder can serve as a workspace folder, the best practice is to start with an empty one.
The code is the same for both new and existing workspaces:
string path; // absolute or relative path to the workspace folder
Workspace workspace = new Workspace();
workspace.Init(path);
You can identify a workspace folder by the presence of a file named metadata.xml. Note that for newly initialized workspaces, this file does not actually exist until a base table is imported or the workspace is explicitly saved by your application.
Importing JSON Data
This example uses the Invoices table from the familiar Northwind database. Rather than use a local SQL Server instance as a data source, we'll download data from a public OData server. Note that this server limits the result set to batches of 500 rows. To keep things simple, we'll stop after retrieving the first batch.
WebClient wc = new WebClient();
string download = wc.DownloadString("https://services.odata.org/v4/Northwind/Northwind.svc/Invoices");
If you enter the above URL in a browser, you will see that the OData 4.0 protocol returns data in JSON format, where the root object defines a value property containing an array of objects. Each of these objects consists of a series of key-value pairs that need to be mapped to a strongly-typed object.
We'll ignore the shipping and address fields and define our Invoice class as follows:
class Invoice
{
    public string Country { get; set; }
    public string Salesperson { get; set; }
    public int OrderID { get; set; }
    public DateTime OrderDate { get; set; }
    public string ProductName { get; set; }
    public double UnitPrice { get; set; }
    public double Quantity { get; set; }
    public double ExtendedPrice { get; set; }
}
Now we can use the Newtonsoft.Json APIs to parse the raw JSON string, extract the value array, and deserialize it into an IEnumerable collection of Invoice objects:
JObject root = JObject.Parse(download);
JArray values = (JArray)root["value"];
List<Invoice> collection = JsonConvert.DeserializeObject<List<Invoice>>(values.ToString());
Once we have a strongly-typed collection, we can use it to create an ObjectConnector, then call its GetData method to complete the import operation:
var connector = new ObjectConnector<Invoice>(workspace, collection);
connector.GetData("Invoices");
workspace.Save();
The base table named Invoices is now ready for use, and the workspace folder contains a like-named subfolder. In your startup code, you can use the TableExists method of the Workspace class to check whether a base table already exists, preventing import code from executing unnecessarily.
TIP: If you need to import data from a SQL Server database, add a reference to the System.Data.SqlClient package to your project. Create and initialize SqlConnection and SqlCommand instances as you normally would, then use the DbConnector class instead of ObjectConnector to import the data into a new base table.
Executing Queries and Viewing Results
To define a query, first get an object representing a previously imported base table:
dynamic invoices = workspace.table("Invoices");
Next, use an anonymous object to specify one or more columns from the base table. In this example, we define an aggregate column named Total that sums all of the individual sales totals for each country:
dynamic countries = workspace.query("CountrySales", new {
    invoices.Country,
    Total = Op.Sum(invoices.ExtendedPrice)
});
Note that table/query names must be unique. You cannot have a base table and a query that share the same name. Lastly, execute the query as follows:
countries.Query.Execute();
If all goes well, the query results will be written to a like-named subfolder within the workspace, using the same storage format as base tables. To retrieve the data for display, use the GetQueryData method, then use the DataList helper class to output the results to the console:
IDataList results = workspace.GetQueryData("CountrySales");
DataList.Write(results, Console.Out);
For this example, the output is as follows, in CSV format (JSON output is also supported):
"Country","Total"
"Argentina","1814.8"
"Austria","104874.98"
"Brazil","6439.38"
"Canada","20801.61"
"France","42113.22"
"Germany","20864.43"
"Mexico","8527.73"
"Spain","4232.85"
"Sweden","24927.58"
"Switzerland","12348.88"
"UK","35960.69"
Note that including a column in a query implies grouping on that column, even if you do not specify an aggregate function. If we had omitted the Total column, the result would contain the same number of rows with the same list of distinct country names.
To display the results in descending numerical order, you would add the following line after the call to GetQueryData:
DataList.Sort(results, "Total", false);
If you are using C1DataEngine in an ASP.NET Core web application, you can use the ClassFactory helper class to transform query results into a bindable collection of strongly-typed objects, as in the following example (which assumes that the Program class has been modified to return a static Workspace object):
public class IndexModel : PageModel
{
    public List<object> CountrySales { get; set; }

    public void OnGet()
    {
        IDataList results = Program.Workspace.GetQueryData("CountrySales");
        CountrySales = ClassFactory.CreateFromDataList(results, "CountrySales");
    }
}
The associated page markup would then execute a model binding to the CountrySales collection. For example, to populate a FlexPie chart:
<c1-flex-pie binding="Total" binding-name="Country">
    <c1-items-source source-collection="Model.CountrySales"></c1-items-source>
</c1-flex-pie>
Applying Range Expressions
You can add a range expression to a query in order to filter the underlying base table data prior to aggregation. Suppose that we want to alter the previous example to limit the results to a specific product (Tofu). We can accomplish this by inserting two lines (highlighted) within the anonymous object:
dynamic countries = workspace.query("CountrySales", new {
    _range = invoices.ProductName.Eq("Tofu"),
    invoices.ProductName,
    invoices.Country,
    Total = Op.Sum(invoices.ExtendedPrice)
});
The first line uses the Eq operator to restrict the results. The second line is needed to force a grouping on the product name, even though it will be the same name for all aggregate rows:
"ProductName","Country","Total"
"Tofu","Austria","217.39"
"Tofu","France","348.75"
"Tofu","Mexico","69.75"
"Tofu","Sweden","372"
The reason that we need to include the ProductName column is that the _range operator uses internal column indexes to efficiently locate the desired rows, without having to iterate over the entire dataset. If that column is not present in the query, the result set will be empty.
There is another operator, _filter, that is similar to _range except that it always examines the entire dataset. It does not require its columns to be present in the query, and it can handle operators and complex expressions that _range cannot.
Aggregating Date/Time Data
If a base table contains a column whose type is DateTime, you can use the DtPart operator to extract the desired component, such as year or month. The recommended technique is to derive a parent query from the base table that defines the desired calculated column, then derive a second query from the parent that creates a group for the calculated column and specifies an aggregate function.
For example:
dynamic parent = workspace.query(new {
    _base = "*",
    Year = Op.DtPart(invoices.OrderDate, DateTimeParts.Year)
});

dynamic years = workspace.query("YearlySales", new {
    parent.Year,
    Total = Op.Sum(parent.ExtendedPrice)
});

years.Query.Execute();
The first line of the parent query tells C1DataEngine to include all columns from the base table. The second line defines a new column named Year that extracts the year from the OrderDate column.
The results are as follows:
"Year","Total"
"1996","48991.16"
"1997","131723.84"
"1998","102191.15"
Joining Multiple Base Tables
One of the key features of C1DataEngine is the ability to join base tables that come from different sources. In our Northwind example, the Invoices table contains product names but no product category information. However, we can import a second base table that has both columns, then create a join query using both tables. The code to import the second table is mostly the same as before, so we won't repeat it verbatim.
The only changes are as follows:
- In the service URL, replace Invoices with Product_Sales_for_1997.
- In the call to GetData, replace Invoices with Products.
- Replace references to the Invoice class with references to the Product class.
class Product
{
    public string CategoryName { get; set; }
    public string ProductName { get; set; }
}
Once the new table has been imported, you can use the following code to obtain a reference to it:
dynamic products = workspace.table("Products");
Next, create a join query using the following code. The first argument to the join function is a reference to the primary base table (invoices).
dynamic join = workspace.join(invoices, new {
    Categories = products.CategoryName | invoices.ProductName == products.ProductName
});
For join queries, the anonymous object has special syntax. The name to the left of the equals sign (Categories) is just a placeholder. The expression to the left of the vertical bar specifies which columns to use from the secondary table (Products). To specify more than one column, chain them together with the + operator.
The expression to the right of the vertical bar denotes the join condition.
Join queries do not contain aggregates, so we need to define and execute a new query based upon the join:
dynamic categories = workspace.query("CategorySales", new {
    Category = join.CategoryName,
    Total = Op.Sum(join.ExtendedPrice)
});

categories.Query.Execute();
This query yields the following results:
"Category","Total"
"Beverages","40919.09"
"Condiments","27812.19"
"Confections","37904.75"
"Dairy Products","58217.08"
"Grains/Cereals","29826.37"
"Meat/Poultry","32133.84"
"Produce","30254.47"
"Seafood","25838.36"
Using the Command Line Tool
Earlier I alluded to a third NuGet package not referenced in projects. This package implements a .NET Core global tool that provides command line access to most of the functionality of C1DataEngine. For example, you might use the command line tool to import base tables, run queries, or view results produced by your applications.
To install the tool, run the following at a command prompt:
dotnet tool install --global C1.DataEngine.Tool
To see a complete list of command line options, run the following:
c1dataengine --help
For the Northwind example presented earlier, you can use the command line tool to produce the same results without coding.
To import the Invoices table:
c1dataengine table Invoices --provider json --connect "URI=https://services.odata.org/v4/Northwind/Northwind.svc/Invoices;JSONPATH=$..value[*]"
To execute the CountrySales query:
c1dataengine query CountrySales --table Invoices --column Country --column "Total=Sum(ExtendedPrice)"
To display the results of that query in descending numeric order:
c1dataengine result CountrySales --sort Total-
You can use the command line tool to isolate import operations from your application code. It also comes in handy for examining query results generated by an ASP.NET Core application, or for deleting unwanted queries and base tables.
If you have any questions about this tutorial, please leave us a comment. Additionally, if you have a request for a specific demo, be sure to leave a comment below.
Happy development using ComponentOne!

John Juback