Create Adaptive and Resolution-Independent WinForms Apps for .NET 6
It’s a priority today to develop software that can adapt to various screen resolutions and display sizes without losing functionality or usability. Building adaptive and resolution-independent applications ensures your software remains relevant and functional across generations of devices without the need for constant updates or redesigns. Such apps can give your product a competitive edge and ensure that your software remains relevant, competitive, and user-friendly.
This article explores a few options for creating adaptive and resolution-independent Windows Applications using .NET.

WinForms versus WPF for Adaptive Apps
When developing this kind of Resolution-Independent Windows Application from scratch, the first thing that comes to mind is using WPF as a technology because of its design principles and features like using XAML, vector-based graphics, and different layout controls. This makes WPF a powerful choice for creating cross-device and cross-resolution applications in the Windows ecosystem.
To achieve adaptive resolution in WPF, the following steps may be followed:
- Apply best practices to standard layout controls such as Grid and StackLayout
- Allow UI elements to always fill their parent and avoid using explicit sizes unless necessary
- Design ContentViews for different views, such as smaller screens or dual-screen
- Take advantage of the Visual State Manager to manage different content views
However, circumstances such as resource availability, timeliness, or maintaining compatibility with older systems or Windows versions do not support WPF or other more recent UI frameworks. In these situations, improving the resolution independence of a WinForms application can be a viable option.
To achieve adaptive resolution in WinForms, the following practices may be required:
- Use layout containers and controls like TableLayoutPanel and FlowLayoutPanel to adapt to different screen sizes and orientations.
- Utilize anchoring and docking properties to ensure that UI elements adjust their positions and sizes dynamically.
- Implement custom logic to handle different screen resolutions and adjust UI elements programmatically.
- Use high-resolution images and icons to maintain visual quality on high-DPI displays.
How to Create Resolution Independent WinForms App using ComponentOne Sizer
ComponentOne WinForms Edition includes a couple of components that help deliver adaptive Windows Forms for .NET Framework, .NET 6, and .NET 8.
Specifically, the C1Sizer library provides two powerful components, C1Sizer and C1SizerLight. They make it easy to create layouts for your app that work well on different screen sizes without needing to do a lot of extra work or write any custom logic just by following a few simple steps.
Want to Try It Out? Download ComponentOne Today!
Let’s pick a use case where we need to develop this kind of layout to practically understand the functionality of these components. Creating forms is ideal for scenarios where structured data input or retrieval is necessary, such as user registrations, contact forms, or order submissions. Making it resolution-independent helps maintain visual clarity, readability, and functionality, enhancing user satisfaction and accessibility. So, let’s see how to create a resolution-independent form using both the Sizer APIs in the sections given below.
How to Create an Adaptive Grid Layout using the C1Sizer Control
C1Sizer is a container control that enhances the Dock and Anchor attributes offered by .NET layout features. With the help of C1Sizer's advanced grid layout manager, you can create a grid of bands on which controls can be placed. These bands are automatically recalculated when you change the Sizer control's size, and the controls it contains are automatically shifted to their respective new positions.
If you’ve developed with a XAML framework like WPF, you are familiar with the Grid control. C1Sizer provides the XAML Grid layout to Windows Forms design-time without needing to write any markup.
To create a new resolution independent form using C1Sizer control in .NET 6, follow these steps:
- Create a new Windows Forms App, configure the project, and set the Framework to .NET6.
- Install C1.Win.Sizer package using NuGet Package Manager. Once the package is installed, the C1Sizer control will automatically appear in the Toolbox.
- Drag the Sizer control from the Toolbox onto the form and configure its Dock property as "Fill" to occupy the entire form.
Note: The Sizer control is now part of the form. Initially, it doesn't have a grid layout or any child controls configured so that it will display a message with brief usage instructions. You can disregard this message for the time being.
- Right-click the Sizer control to select the Edit Grid option from its context menu. This opens the C1Sizer Grid Editor dialog box for configuring the grid layout.
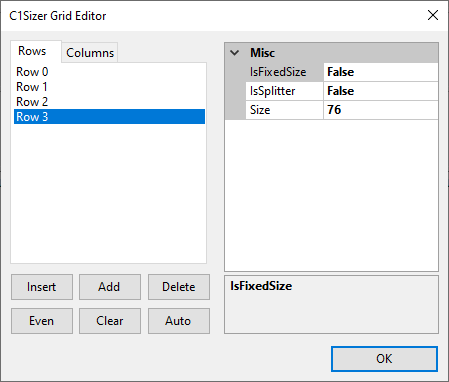
- In the C1Sizer Grid Editor, navigate to the "Rows" tab and utilize the "Add" button to incorporate rows into the layout. Likewise, proceed to the "Columns" tab and add columns to the layout in a similar manner.
In our demonstration, we're adding eight rows and eight columns to the grid layout. To visualize the impact of these alterations on the control, you can place the editor controls adjacent to the grid. - Add your desired controls from the Toolbox to your form.
Here, we added 8 TextBox and 8 Label controls to the form and configured them from the Properties window by setting the AutoSize and TextAlign properties of each label to False and TopRight, respectively, to make it look like below:


Execute the project to observe the automatic resizing of text boxes and labels as the form is resized.

How to Make Any Form Adaptive using C1SizerLight
The C1Sizer component is good under two circumstances: 1) it can use a grid layout, and 2) we are starting with a new form. But if your layout may not easily fit a grid layout, or if you have too many existing forms, then ComponentOne WinForms Sizer has a solution for you, too: C1SizerLight.
The non-visual component C1SizerLight provides resizing capabilities similar to C1Sizer, including font resizing. But you can add it to any existing form, and it works behind the scenes to provide automatic responsive sizing. Just drop a C1SizerLight into the form, and it keeps track of and maintains the form’s size and position.
To create a resolution-independent form using the C1SizerLight component in .NET 6, follow these steps:
- Create a new Windows Forms app (or edit an existing Windows Forms app).
- Install the C1.Win.Sizer package using NuGet Package Manager. Once the package is installed, the C1SizerLight component will automatically appear in the Toolbox.
- Drag the C1SizerLight component from the Toolbox onto the form, which will be visible in the component tray below it.
- Design a form layout by adding controls to the form.

You do not have to set any properties or write any code; just run the project and observe that contained controls and their fonts get resized as you resize the form.

Conclusion
Give the ComponentOne Sizer library a try, and you can make your WinForms app adjust to any screen without needing hard implementation and difficult coding. Your app will just work smoothly on any device, making things simpler for you. So, you can just use C1Sizer and see how your app becomes super adaptable effortlessly.
Download Component WinForms Edition to install the controls, along with helpful samples.
Happy Coding!
Related Blogs
Try Our .NET UI Components & Datagrid
Getting Started With ComponentOne

Prabhat Sharma